DP-700 Episode 2: Lifecycle Management

PowerBI consultant ·
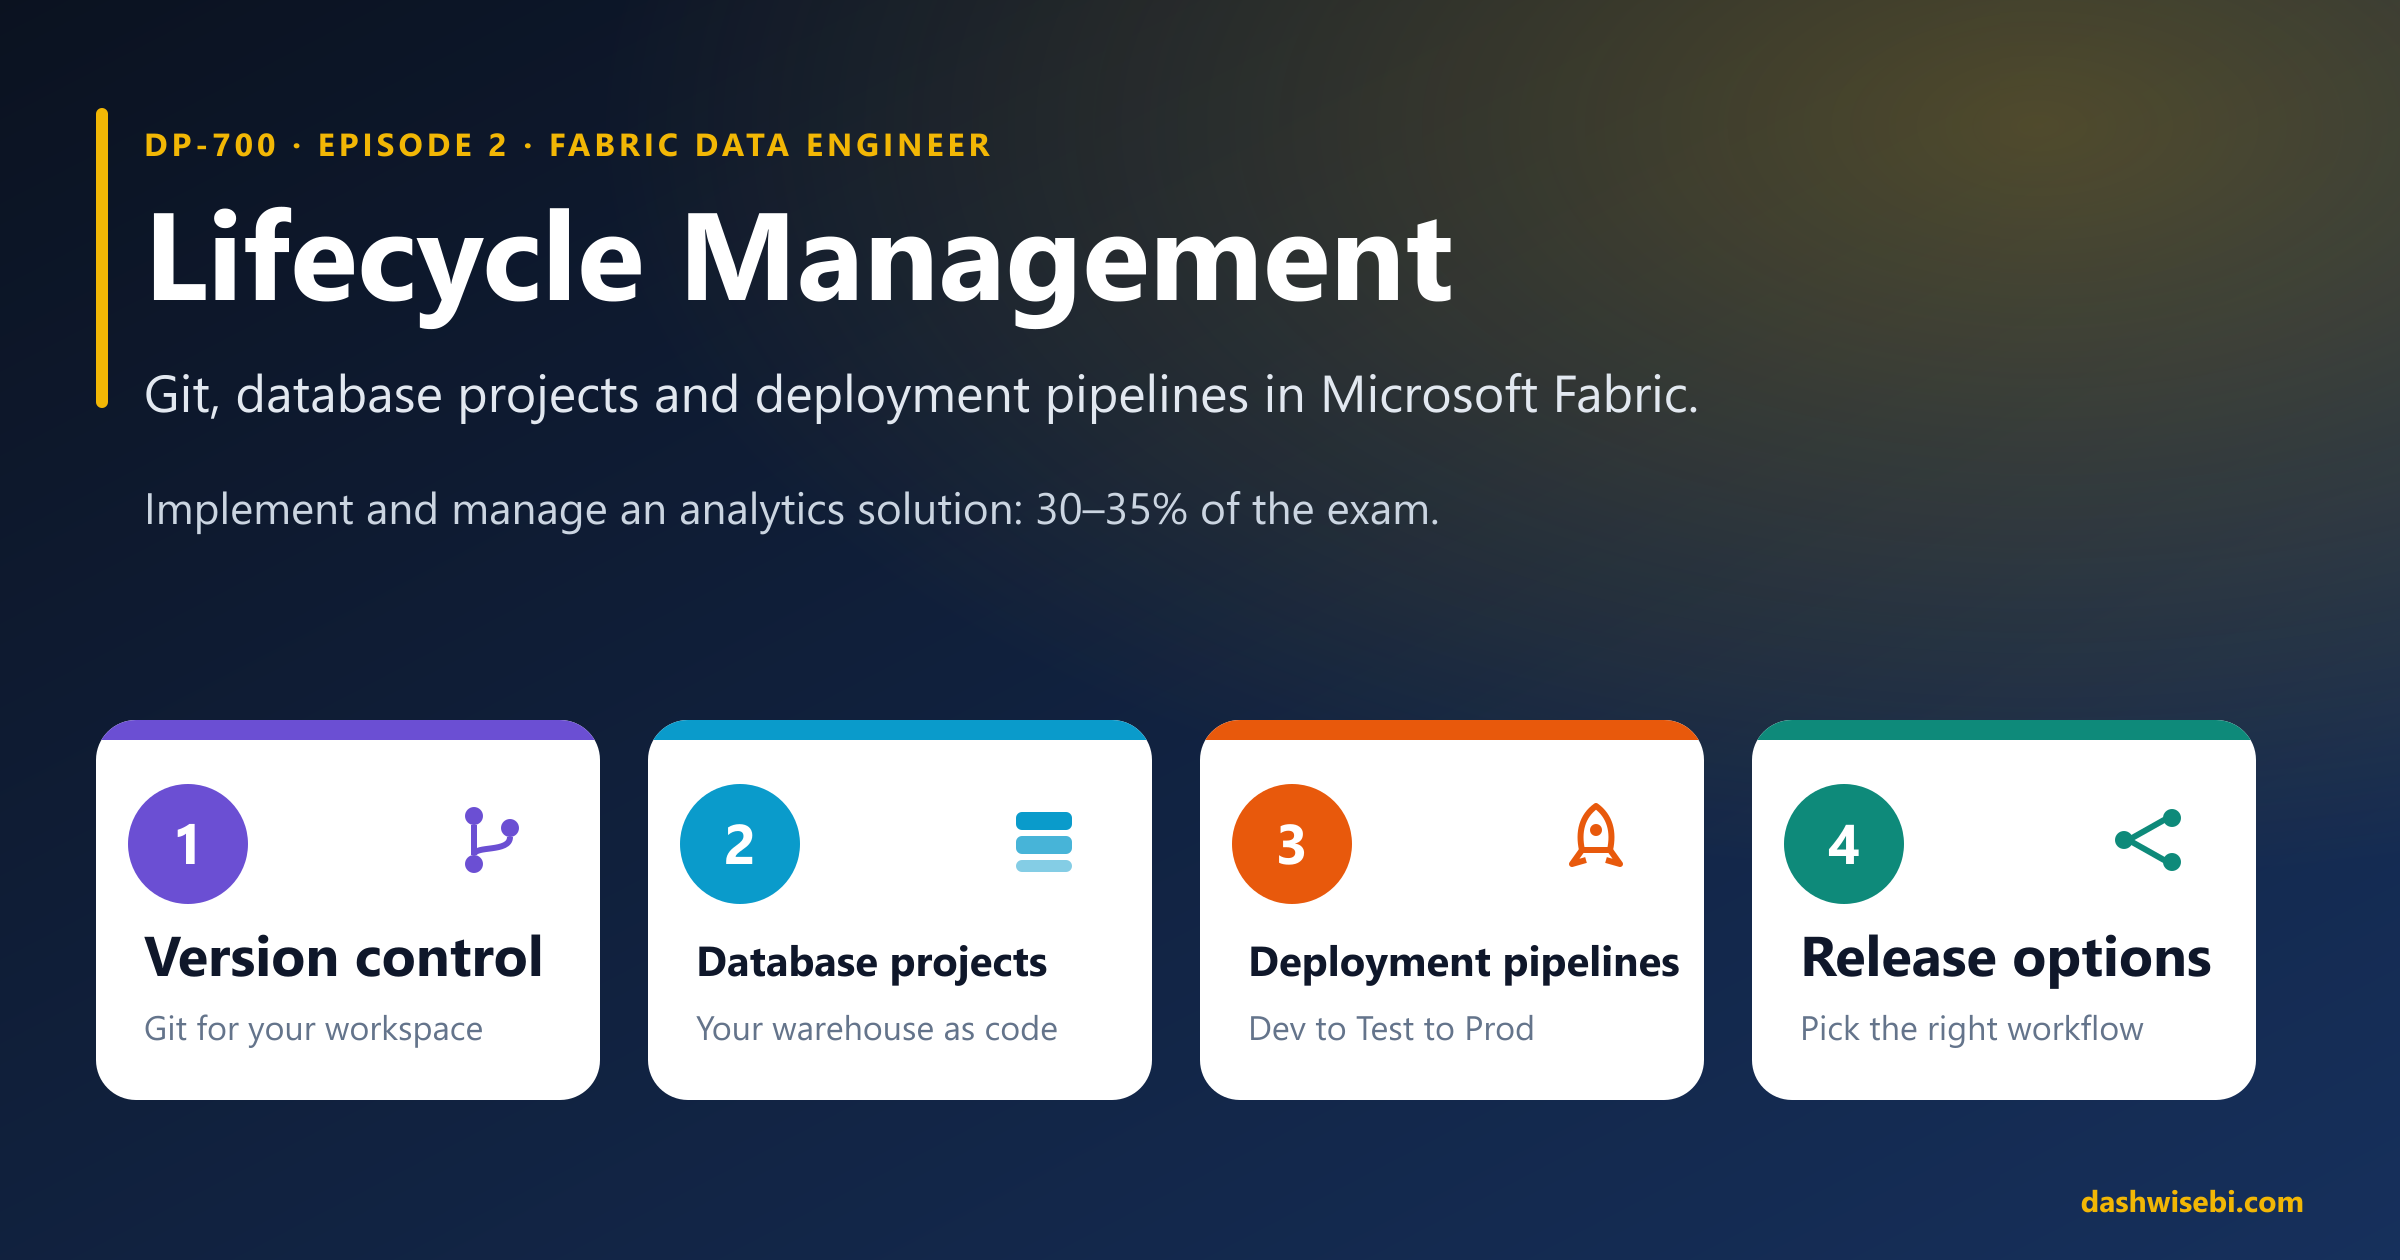
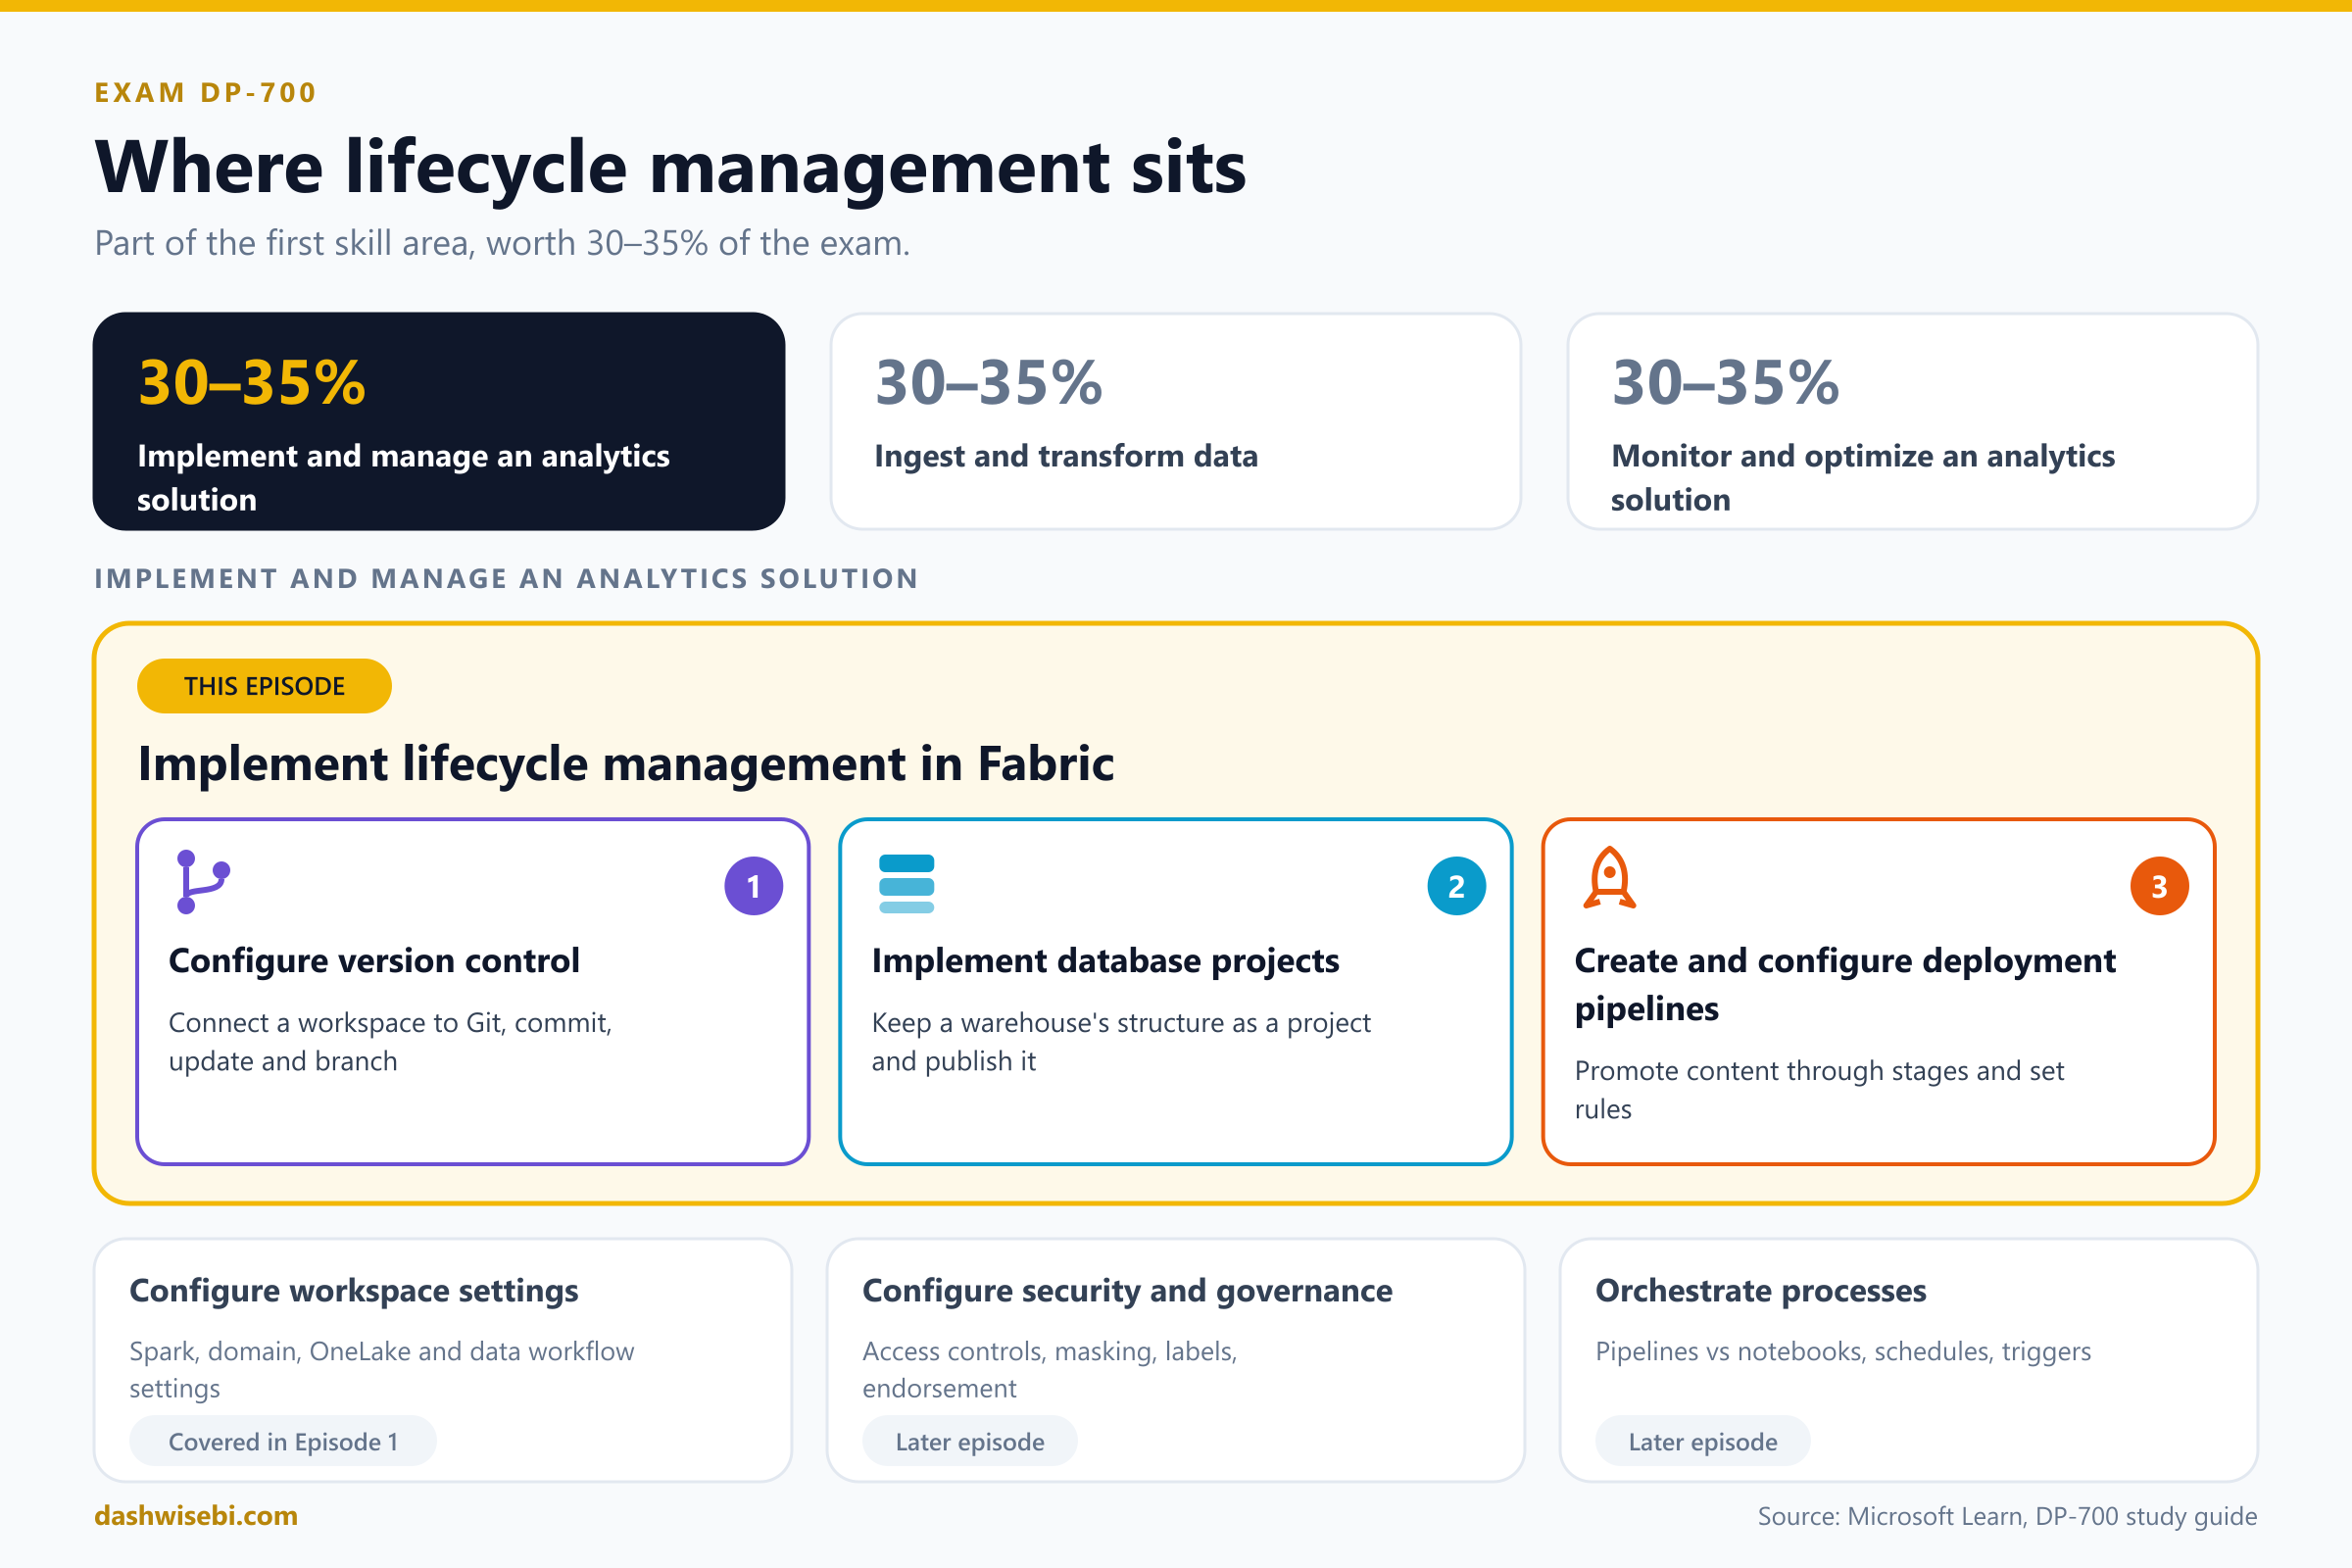
Welcome to Episode 2 of our DP-700 series. In Episode 1 we looked at workspace settings. This time we cover the next group of bullets in the same skill area, Implement and manage an analytics solution (30 to 35 percent of the exam):
Configure version control
Implement database projects
Create and configure deployment pipelines
These three topics are the "lifecycle" of your analytics content: how you save it, how you keep a warehouse as code, and how you move changes from development to production without breaking anything.
The big picture: the journey of one change
Before the details, here is the whole path of a single change. A developer works in an isolated place, saves the change to a Git branch, gets it reviewed in a pull request and merged, updates the shared Dev workspace, and then promotes it to Test and Prod.
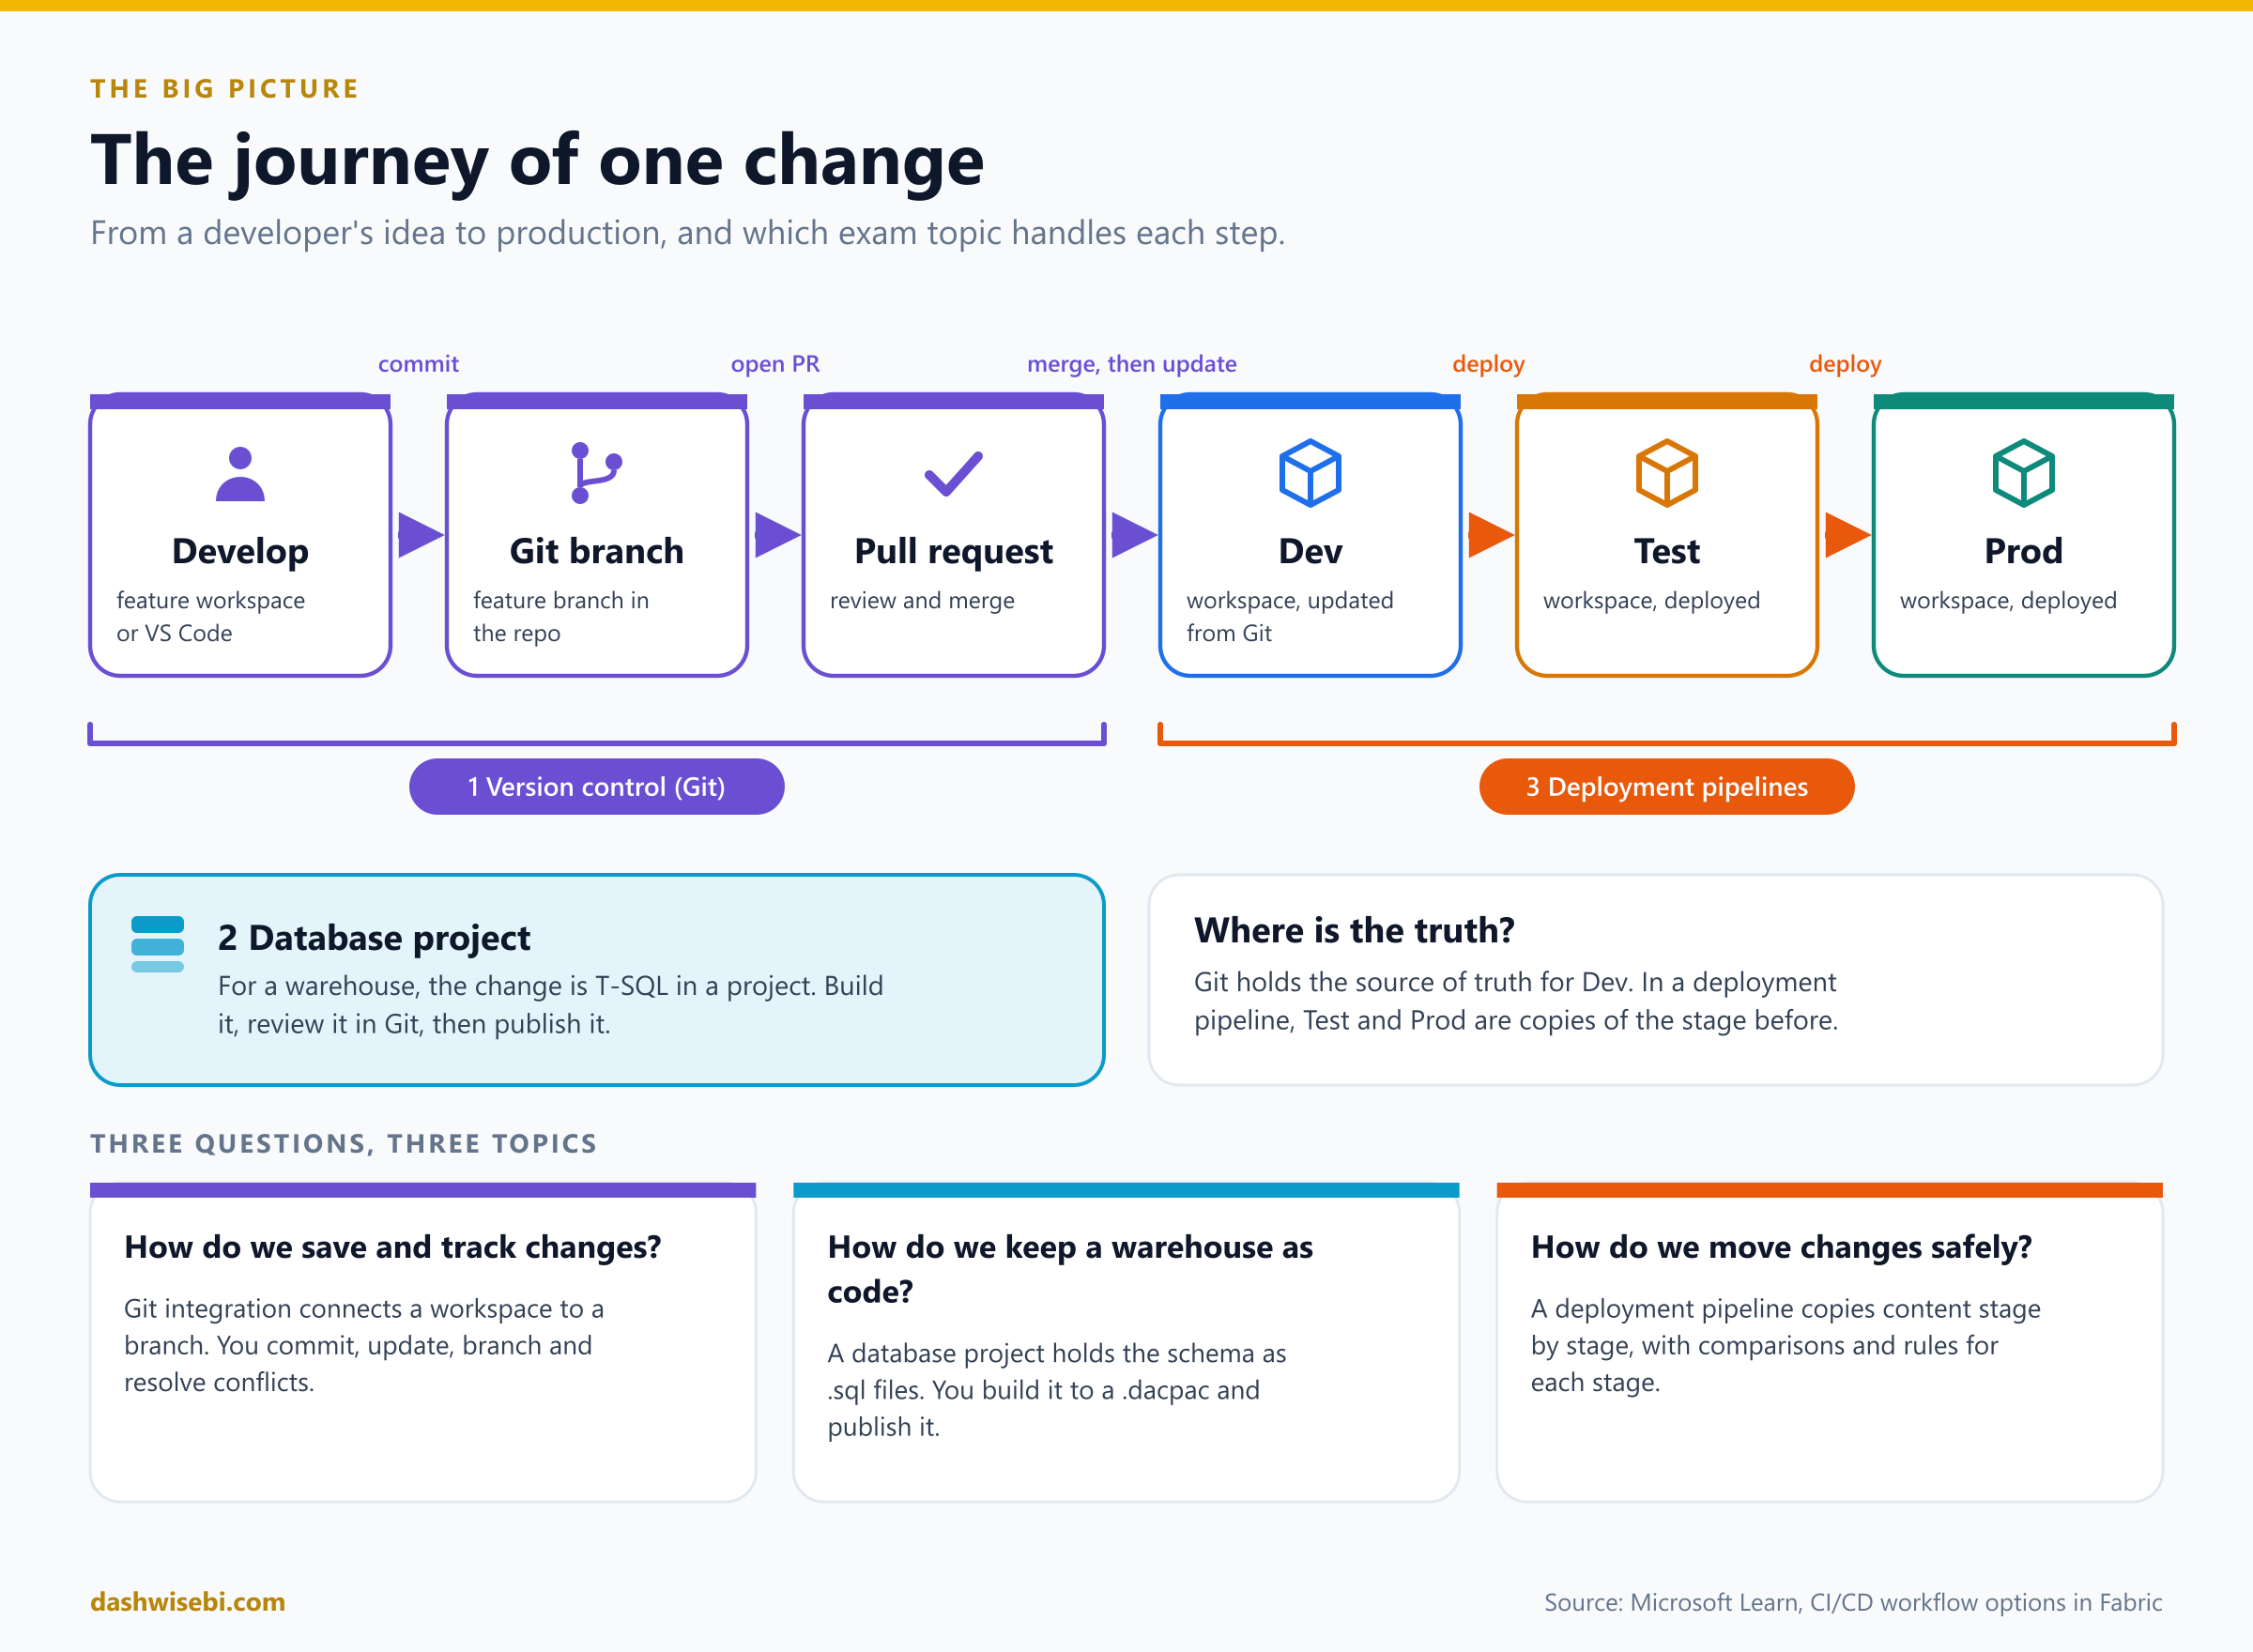
Each of the three exam topics answers one question:
How do we save and track changes? Version control, with Git integration.
How do we keep a warehouse as code? A database project.
How do we move changes safely? A deployment pipeline.
1. Configure version control
Fabric's Git integration lets you back up and version your work, return to an earlier state, collaborate on branches, and use the same source control tools you use for other code. The link is at the workspace level: one workspace is connected to one branch and one folder of a Git repository.
It supports Azure DevOps, GitHub and GitHub Enterprise, in their cloud versions only. Many item types are supported, including lakehouses, notebooks, pipelines, warehouses, semantic models and reports, though some are still in preview. If a workspace contains unsupported items, you can still connect it. The unsupported items are ignored: they aren't saved or synced, and they aren't deleted either.
What you need, and how to connect
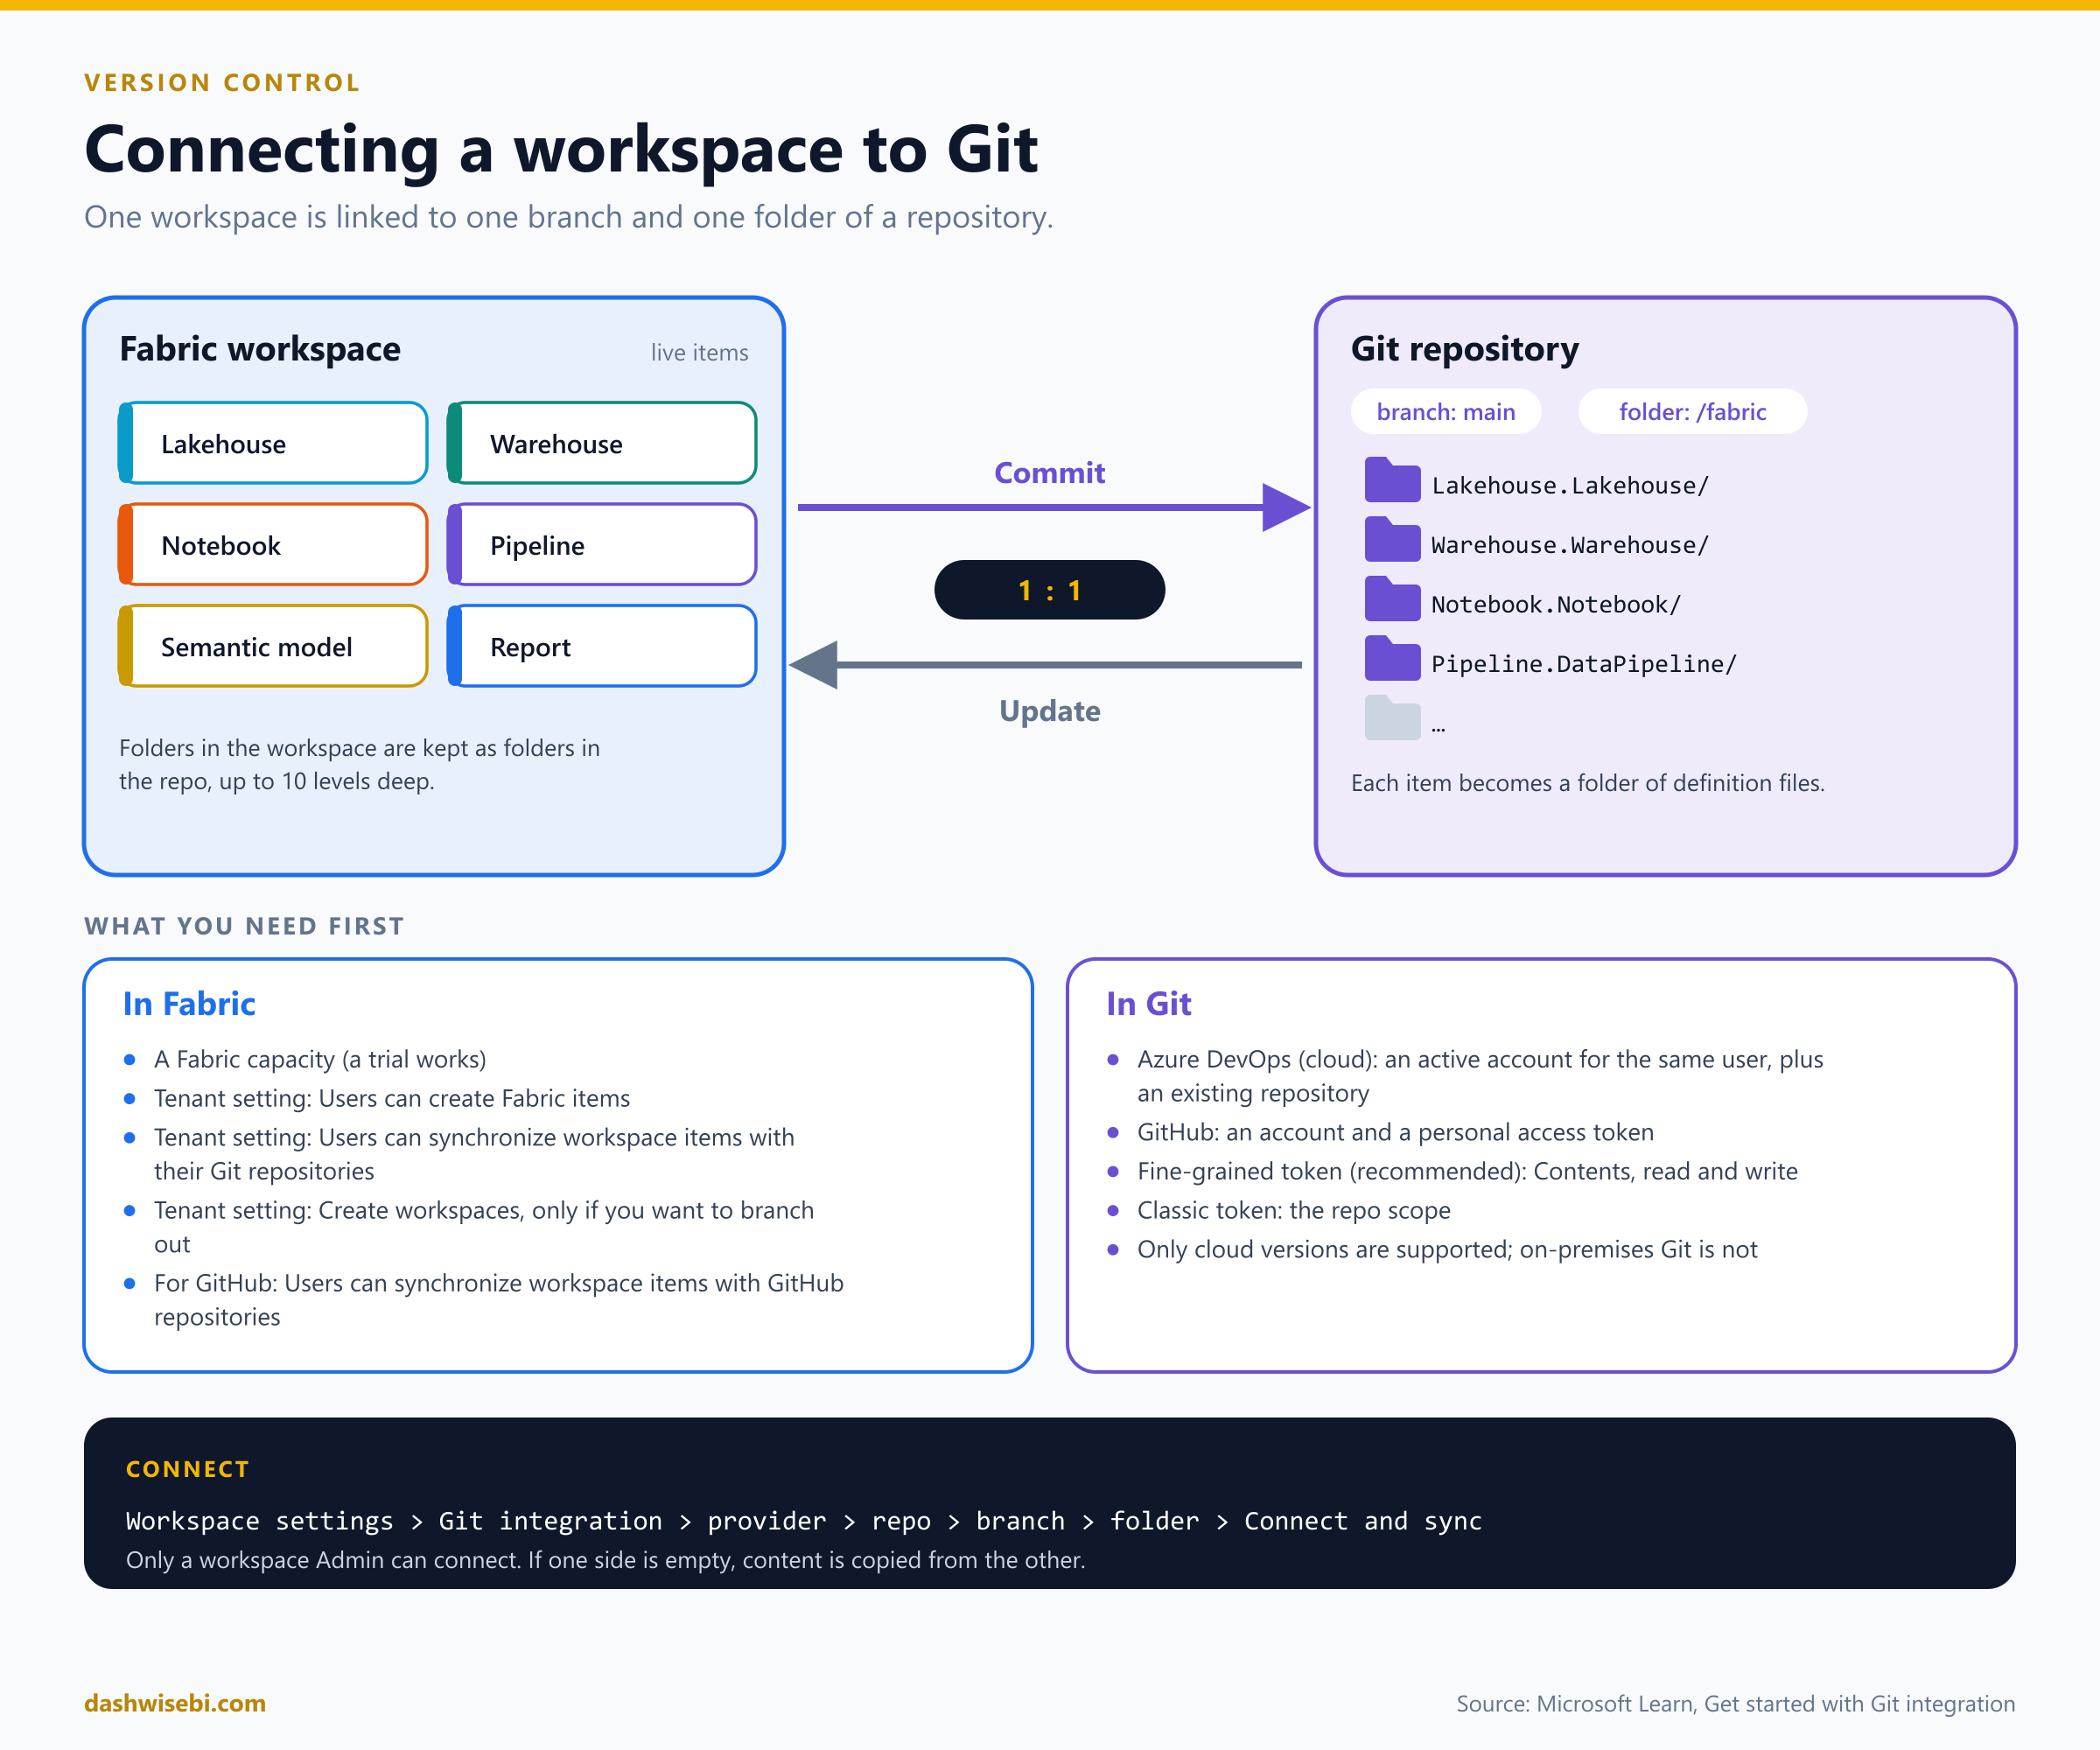
On the Fabric side you need a Fabric capacity (a trial works) and these tenant settings turned on: Users can create Fabric items and Users can synchronize workspace items with their Git repositories. If you want to branch out to a new workspace you also need Create workspaces, and GitHub users need Users can synchronize workspace items with GitHub repositories.
On the Git side, Azure DevOps needs an active account for the same user and an existing repository. GitHub needs an account and a personal access token. A fine-grained token with Contents read and write is recommended, and a classic token needs the repo scope.
To connect, open Workspace settings, choose Git integration, pick your provider, then the repository, branch and folder, and select Connect and sync. Only a workspace Admin can connect. During the first sync, if only one side has content it is copied to the empty side. If both have content, you choose the direction. Choosing to update the workspace from Git overwrites the workspace, so Fabric asks you to confirm, because a Git branch can be restored but a workspace can't.
Two details are worth remembering. The workspace's folder structure is kept in Git (up to 10 levels deep), and the Git connection is per user, so each person who works in a shared workspace signs in to their own Git account.
Everyday work: commit, update, undo
Once connected, each item shows a Git status: Synced, Uncommitted changes (changed in the workspace), Update required (changed in Git) or Conflict (changed in both). The Source control icon shows how many items differ.
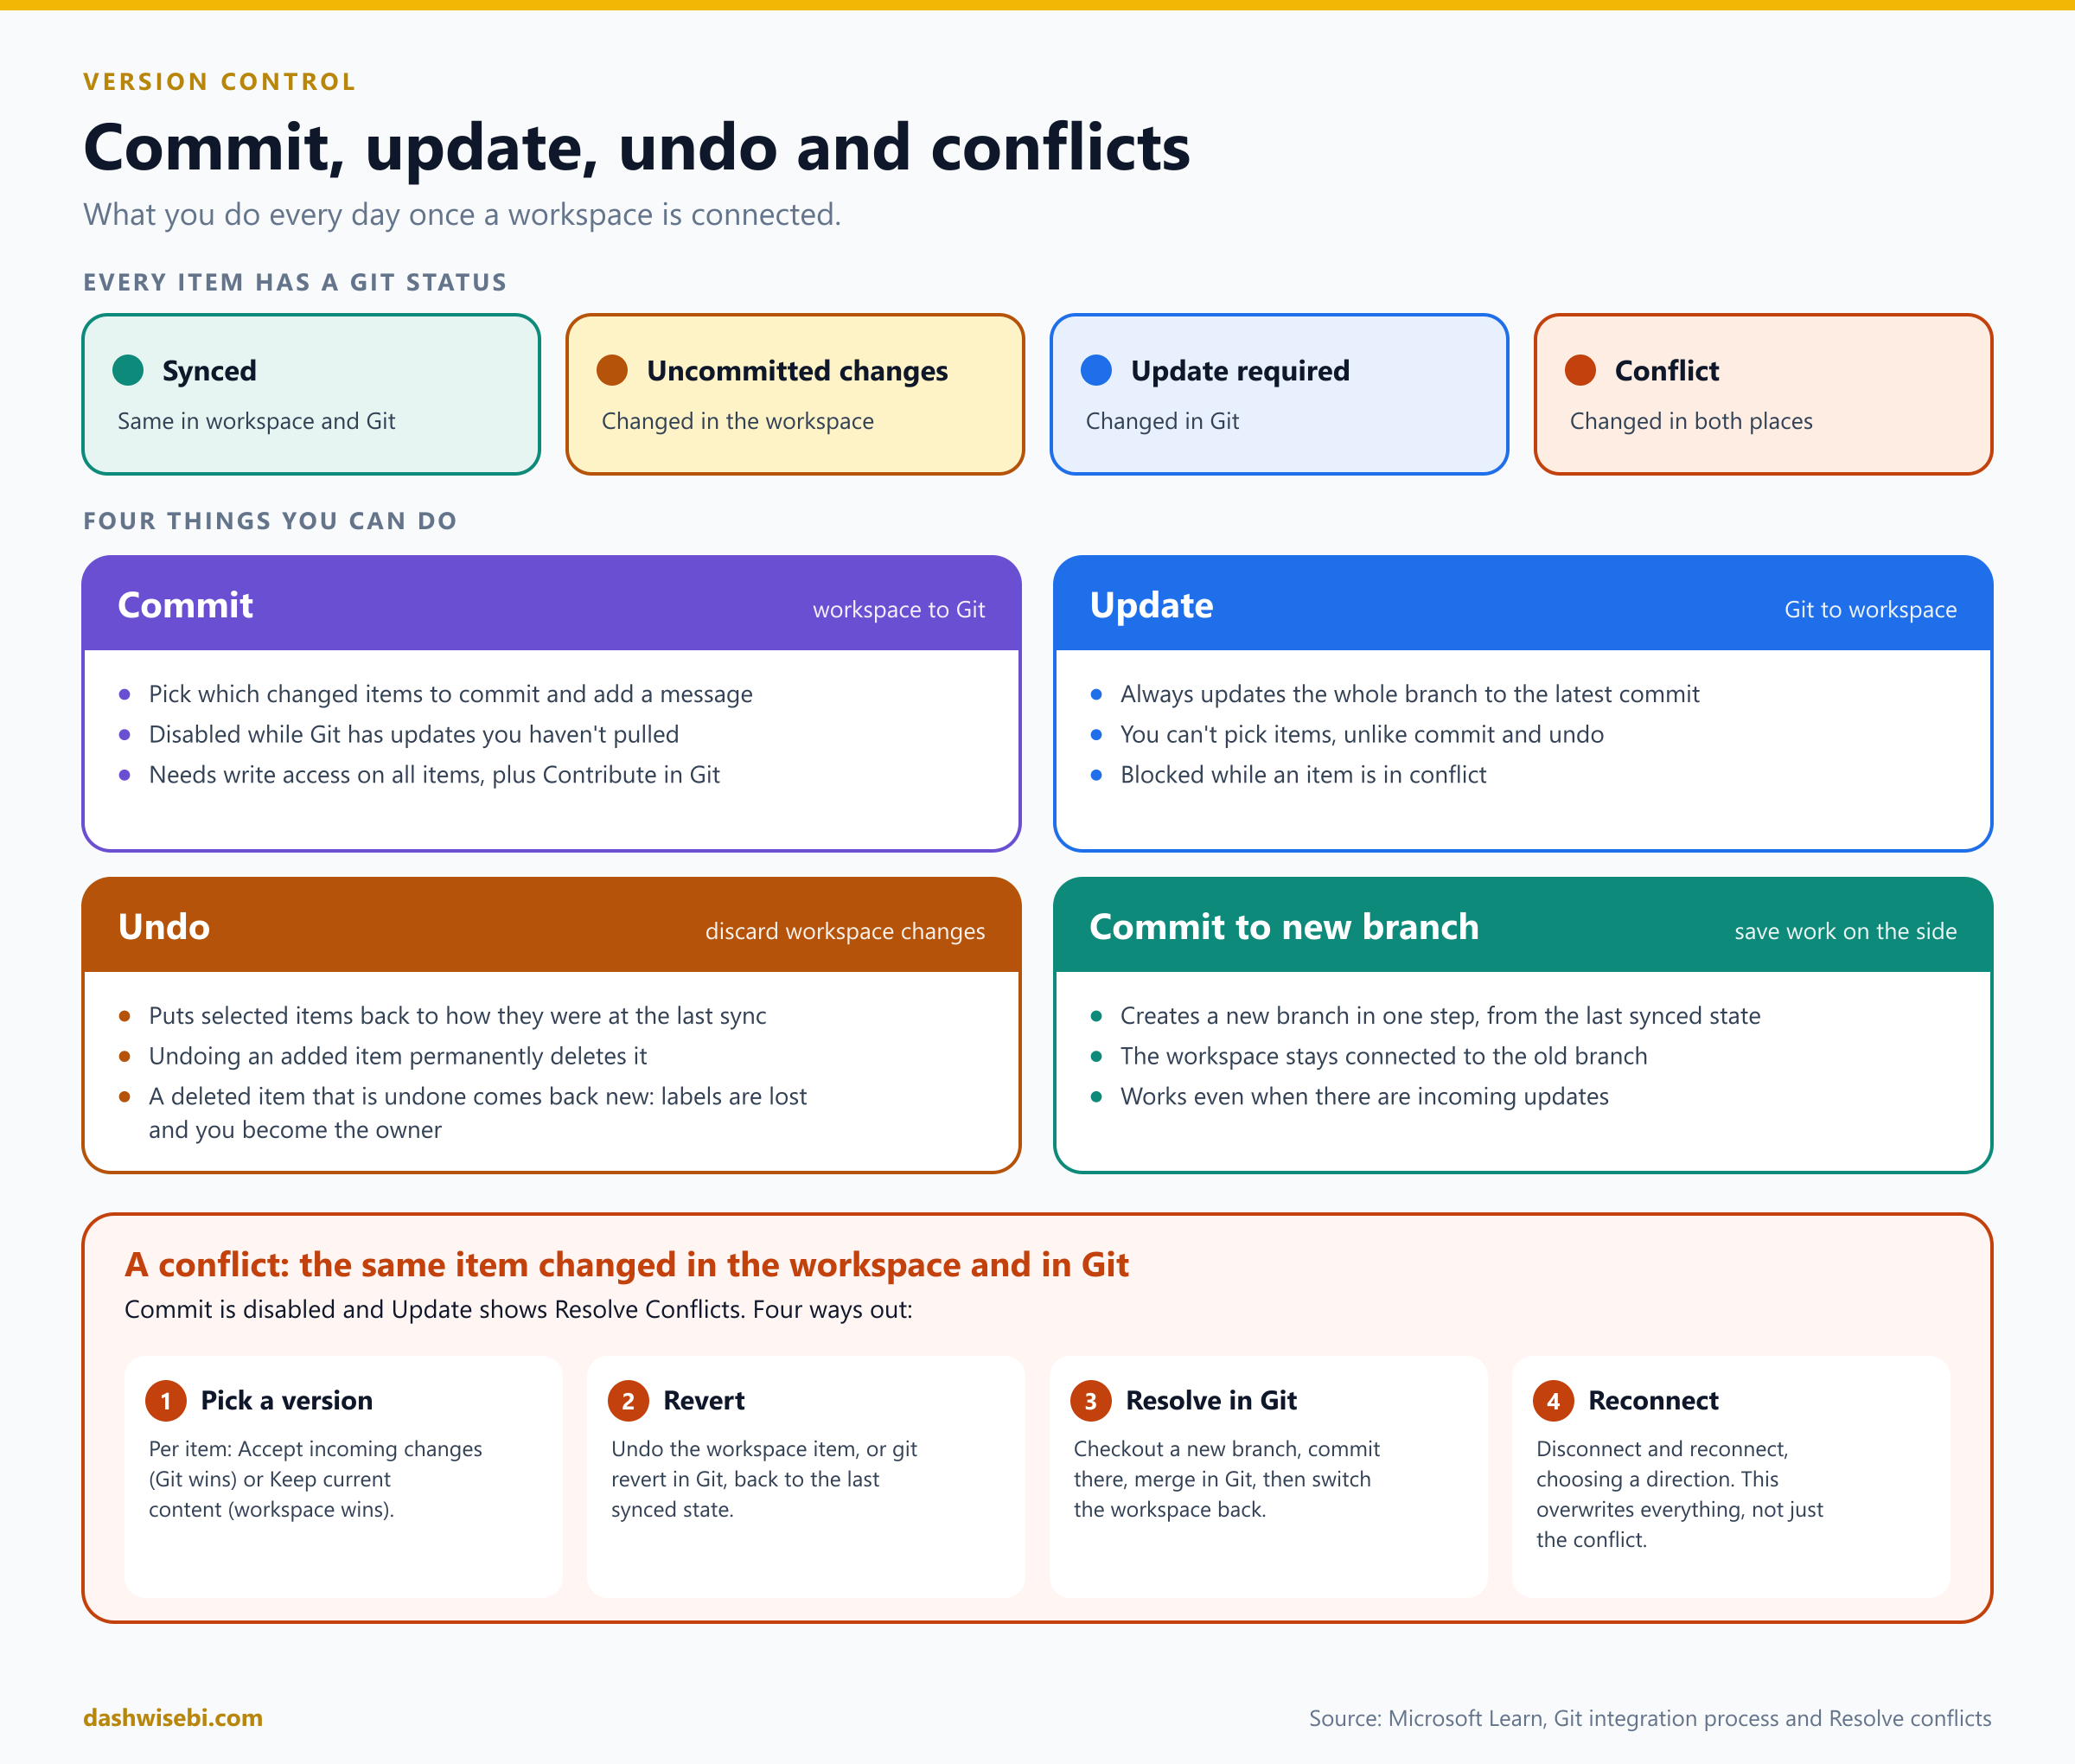
Commit sends workspace changes to Git. You choose which changed items to include and add a message. It is disabled while Git has updates you haven't pulled.
Update brings Git changes into the workspace. Unlike commit and undo, it always updates the entire branch to the latest commit, and you can't pick items. It is blocked while an item is in conflict.
Undo discards saved workspace changes and returns the selected items to their last synced state. Undoing an added item permanently deletes it. If you delete an item and then undo, it is created again as a new item, so its sensitivity labels are lost and you become the owner.
Commit to new branch saves your work to a fresh branch based on the last synced state, without changing the workspace or its connection.
You can only sync in one direction at a time. You can't commit and update together.
Resolving a conflict
A conflict happens when the same item was changed in both the workspace and Git. Commit is then disabled, and Update shows Resolve Conflicts. There are several ways out:
Pick a version in the UI. For each conflicting item choose Accept incoming changes (Git wins and the workspace change is lost) or Keep current content (the workspace wins, and the item becomes an uncommitted change afterwards).
Revert the workspace item with Undo, or revert the Git branch to the last synced state with
git revert.Resolve it in Git. Check out a new branch from the last synced state, commit your changes there, resolve and merge in Git, then switch the workspace back to the original branch.
Disconnect and reconnect, choosing a direction. Be careful: this overwrites everything on one side, not only the conflicting item.
Working in your own workspace: branching out
A workspace is a shared runtime. Anything saved there affects everyone using it. So Git best practice is for each developer to have a separate workspace, which Fabric supports with branch out.
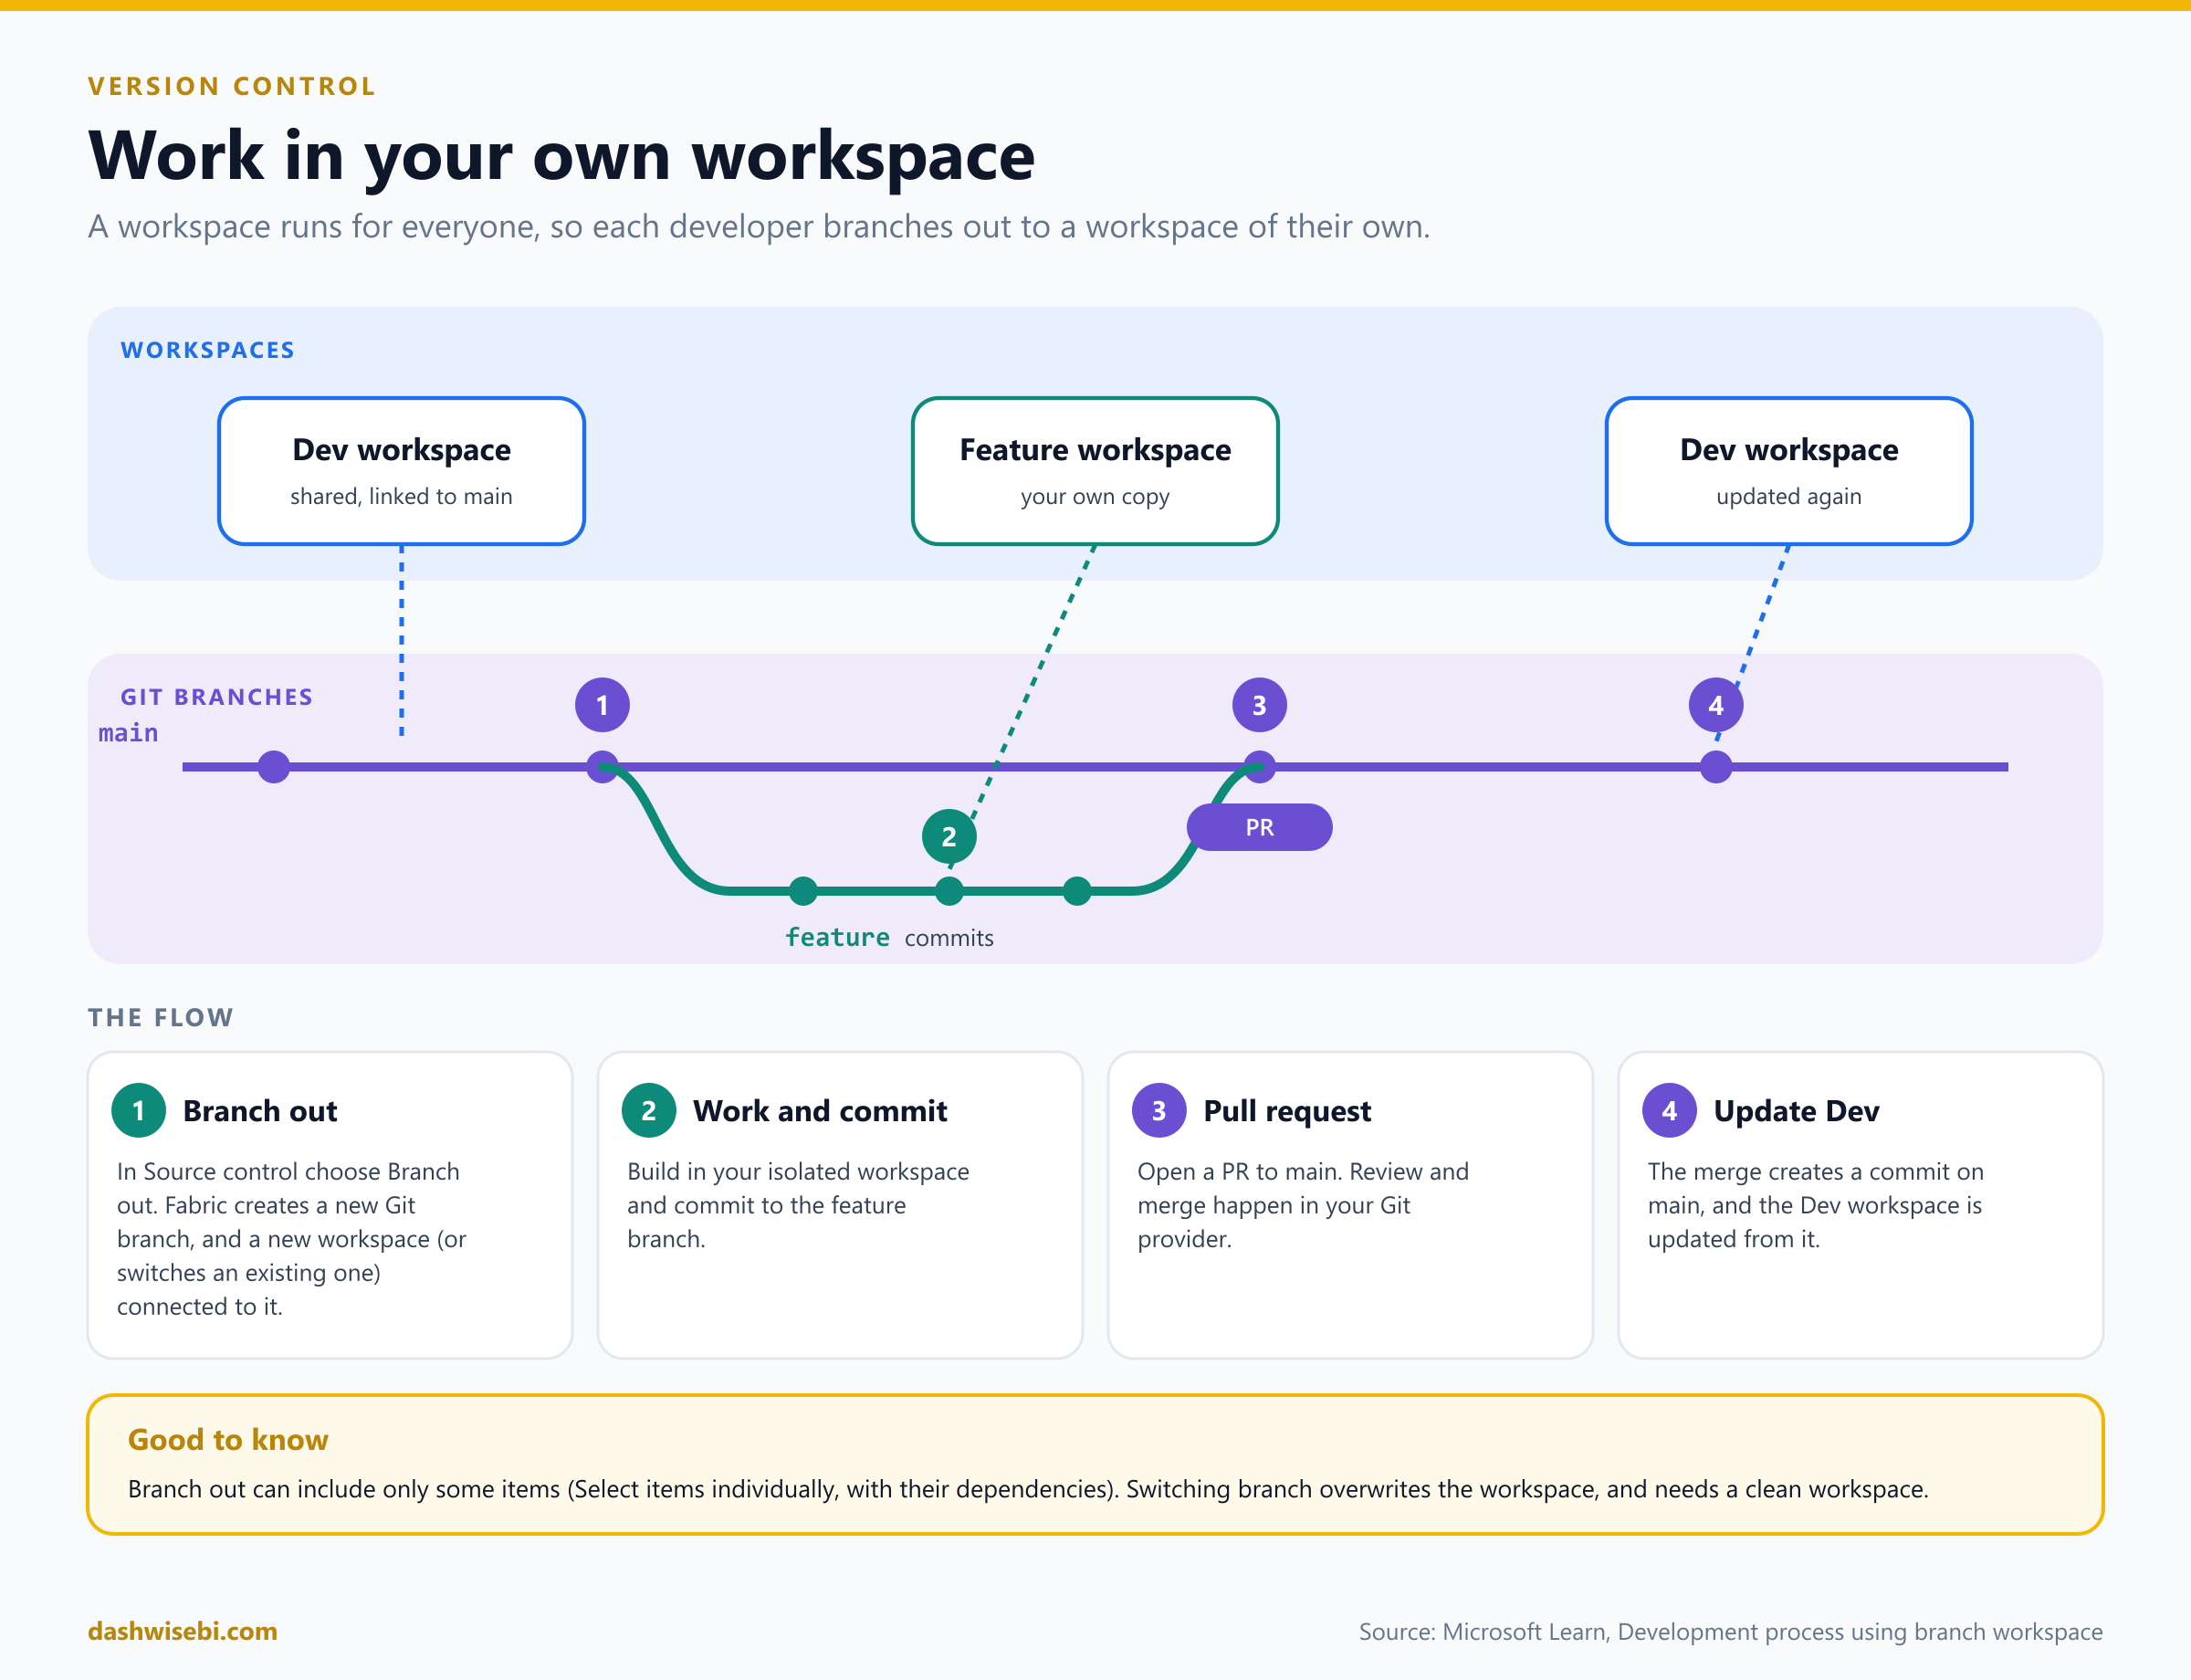
In the Source control pane choose Branch out. Fabric creates a new Git branch and either a new workspace connected to it, or switches an existing workspace to it. You can branch out with only some items, using Select items individually, as long as you include their dependencies.
Build in your isolated workspace and commit to the feature branch.
Open a pull request to the main branch. Review and merge happen in your Git provider.
The merge creates a new commit on main, and the Dev workspace is updated from it.
Two warnings. When you branch out to an existing workspace, items that aren't saved to Git can be lost, so commit first. And Switch branch overwrites the workspace with the other branch's content, deleting items that aren't in it, and it won't run while you have uncommitted changes. The branch you switch to must contain the same directory as the current one.
Who can do what, and the limits
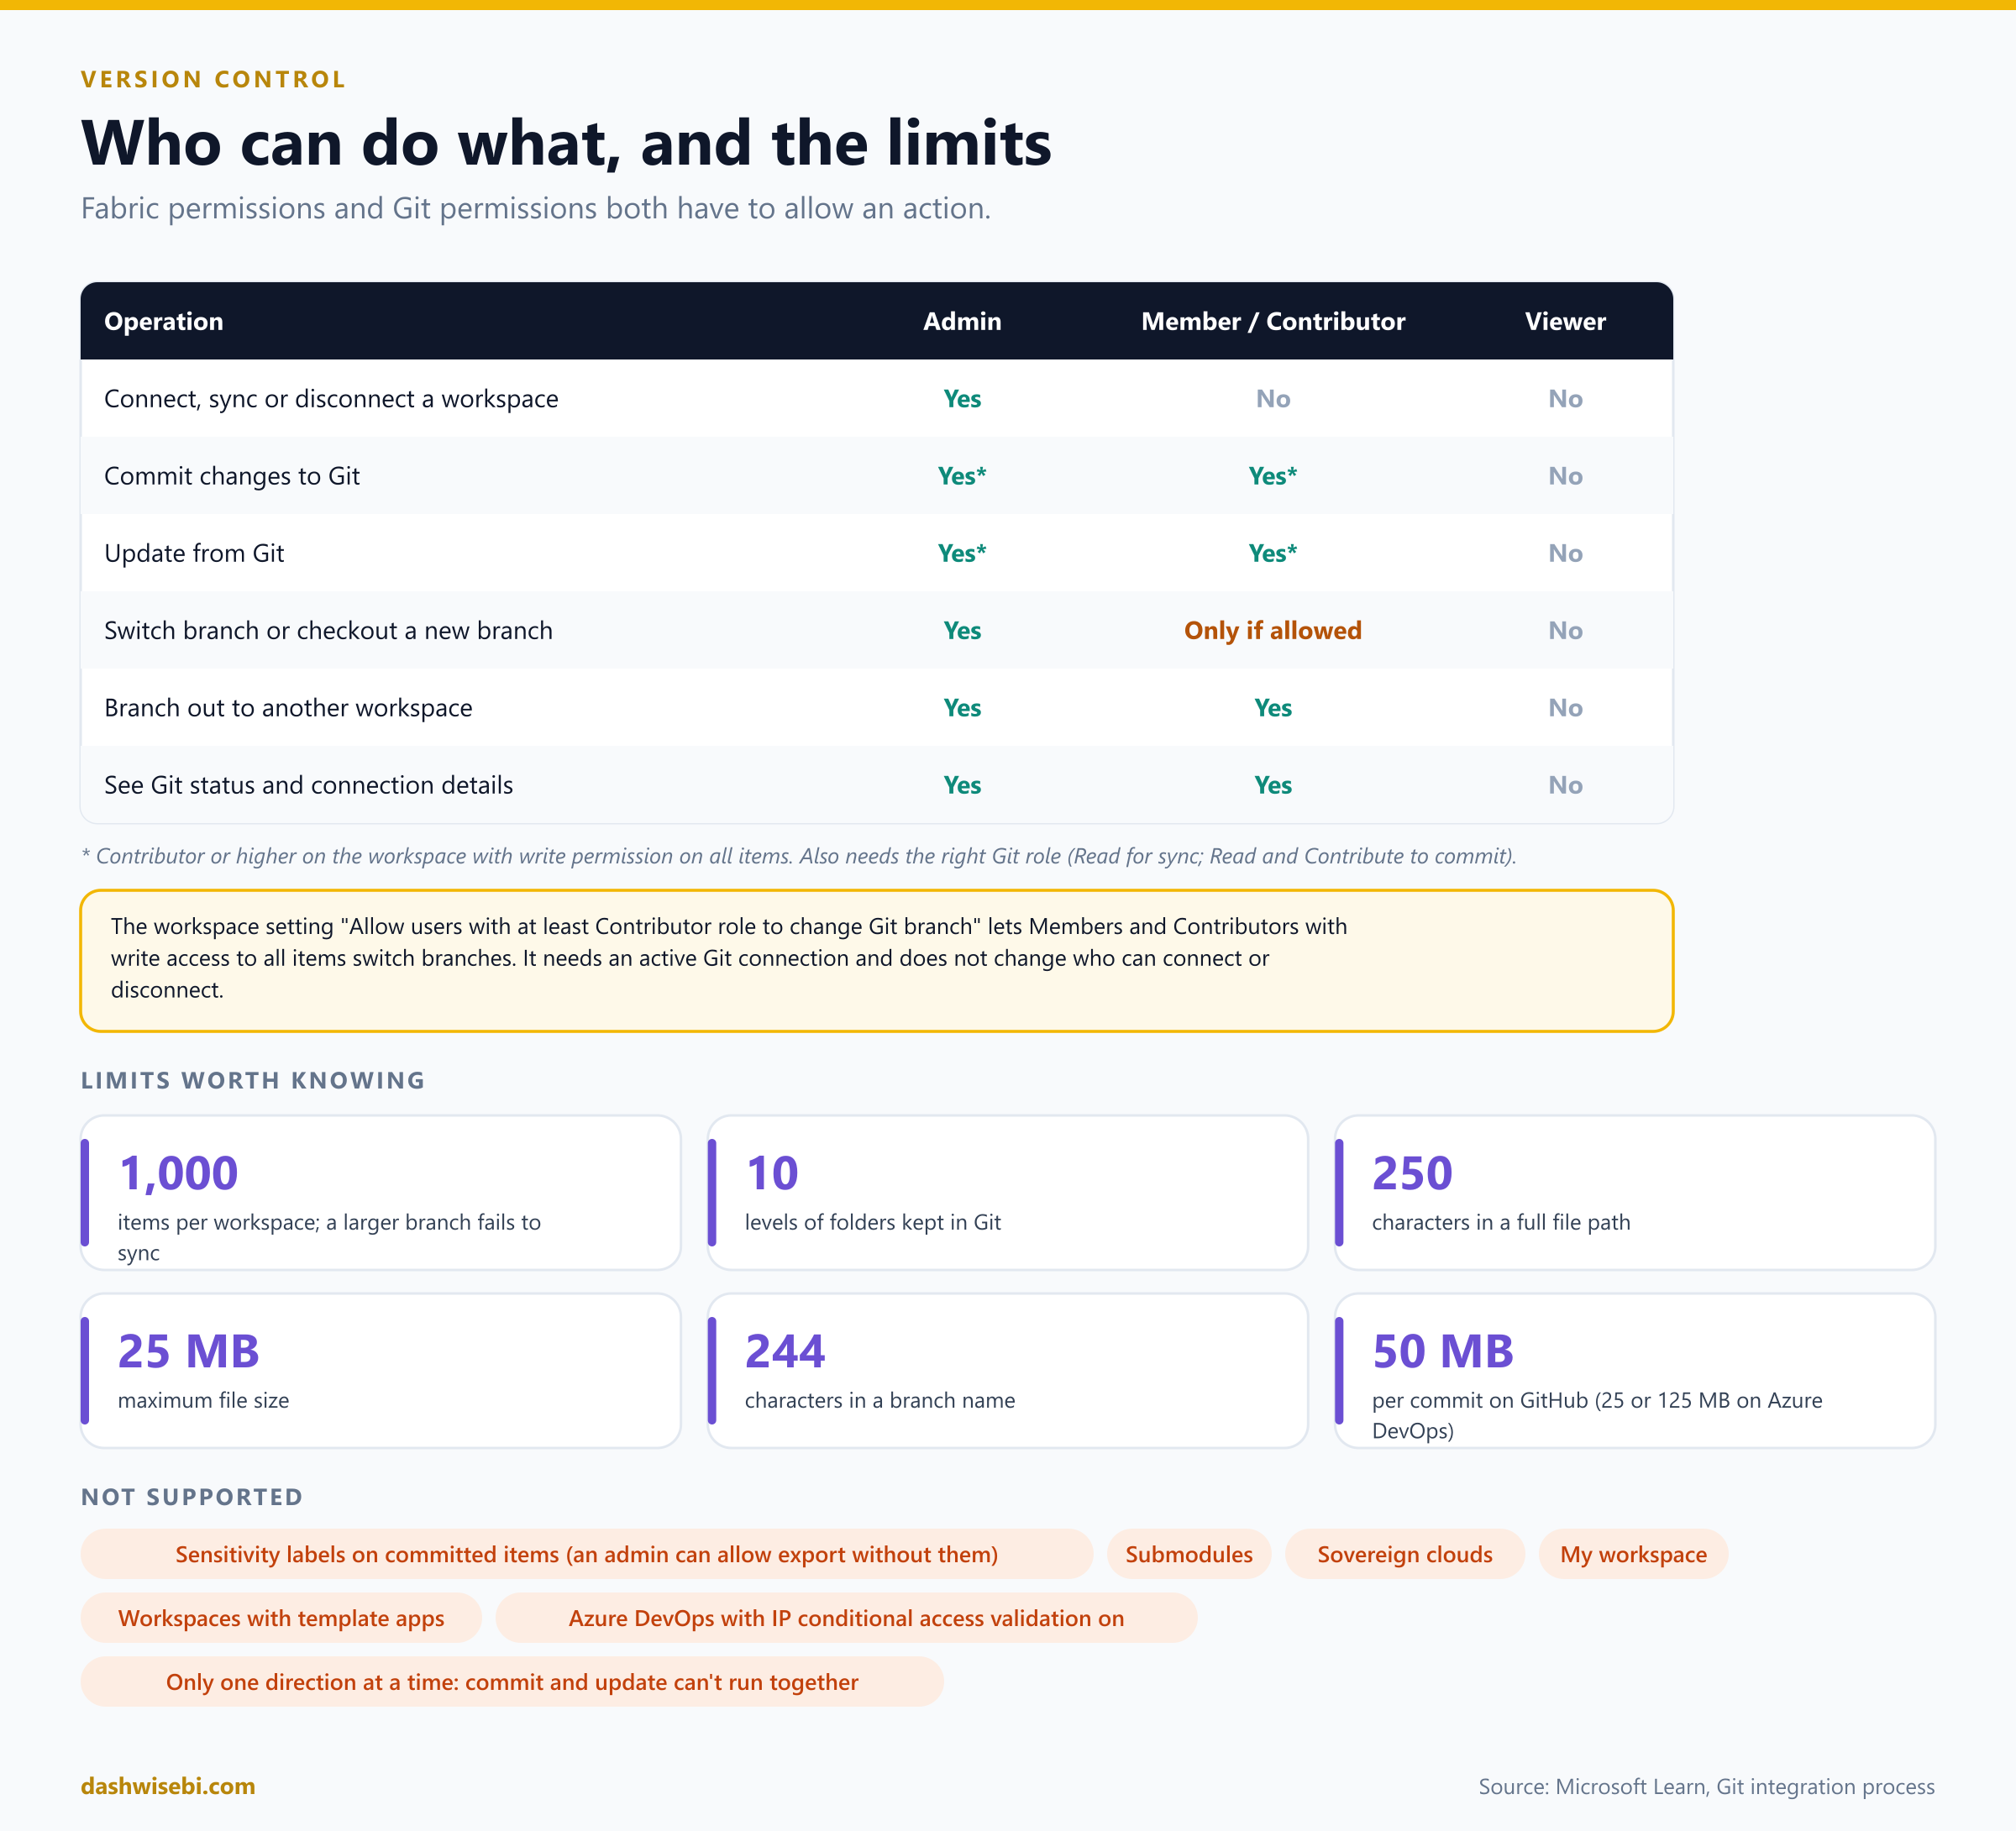
Both your Fabric permissions and your Git permissions must allow an action. The main points:
Connect, sync and disconnect are Admin-only.
Commit and update need at least Contributor with write permission on all items, plus the right Git role (Read for sync, and Read plus Contribute to commit).
Switching branch or checking out a new branch is for Admins. Members and Contributors with write access to all items can do it only if an Admin turns on the workspace setting Allow users with at least Contributor role to change Git branch. It is per workspace and needs an active Git connection.
Branch out is open to Admin, Member and Contributor, and needs the Git permission to create branches.
Viewers can't use Git integration at all.
The limits that tend to appear in questions: a workspace holds at most 1,000 items (a branch with more fails to sync), folders are kept 10 levels deep, a full file path can be 250 characters, a file can be 25 MB, and a branch name can be 244 characters. A commit is limited to 50 MB on GitHub, and to 25 MB or 125 MB on Azure DevOps depending on how you authenticate. Sensitivity labels, submodules and sovereign clouds aren't supported, and "My workspace" can't connect to Git.
2. Implement database projects
For most items, Git stores their definition files. For a Warehouse, the definition is stored as a database project: a set of T-SQL .sql files that describe the warehouse's structure (tables, views, functions and so on). This is the authoritative version of the schema in source control.
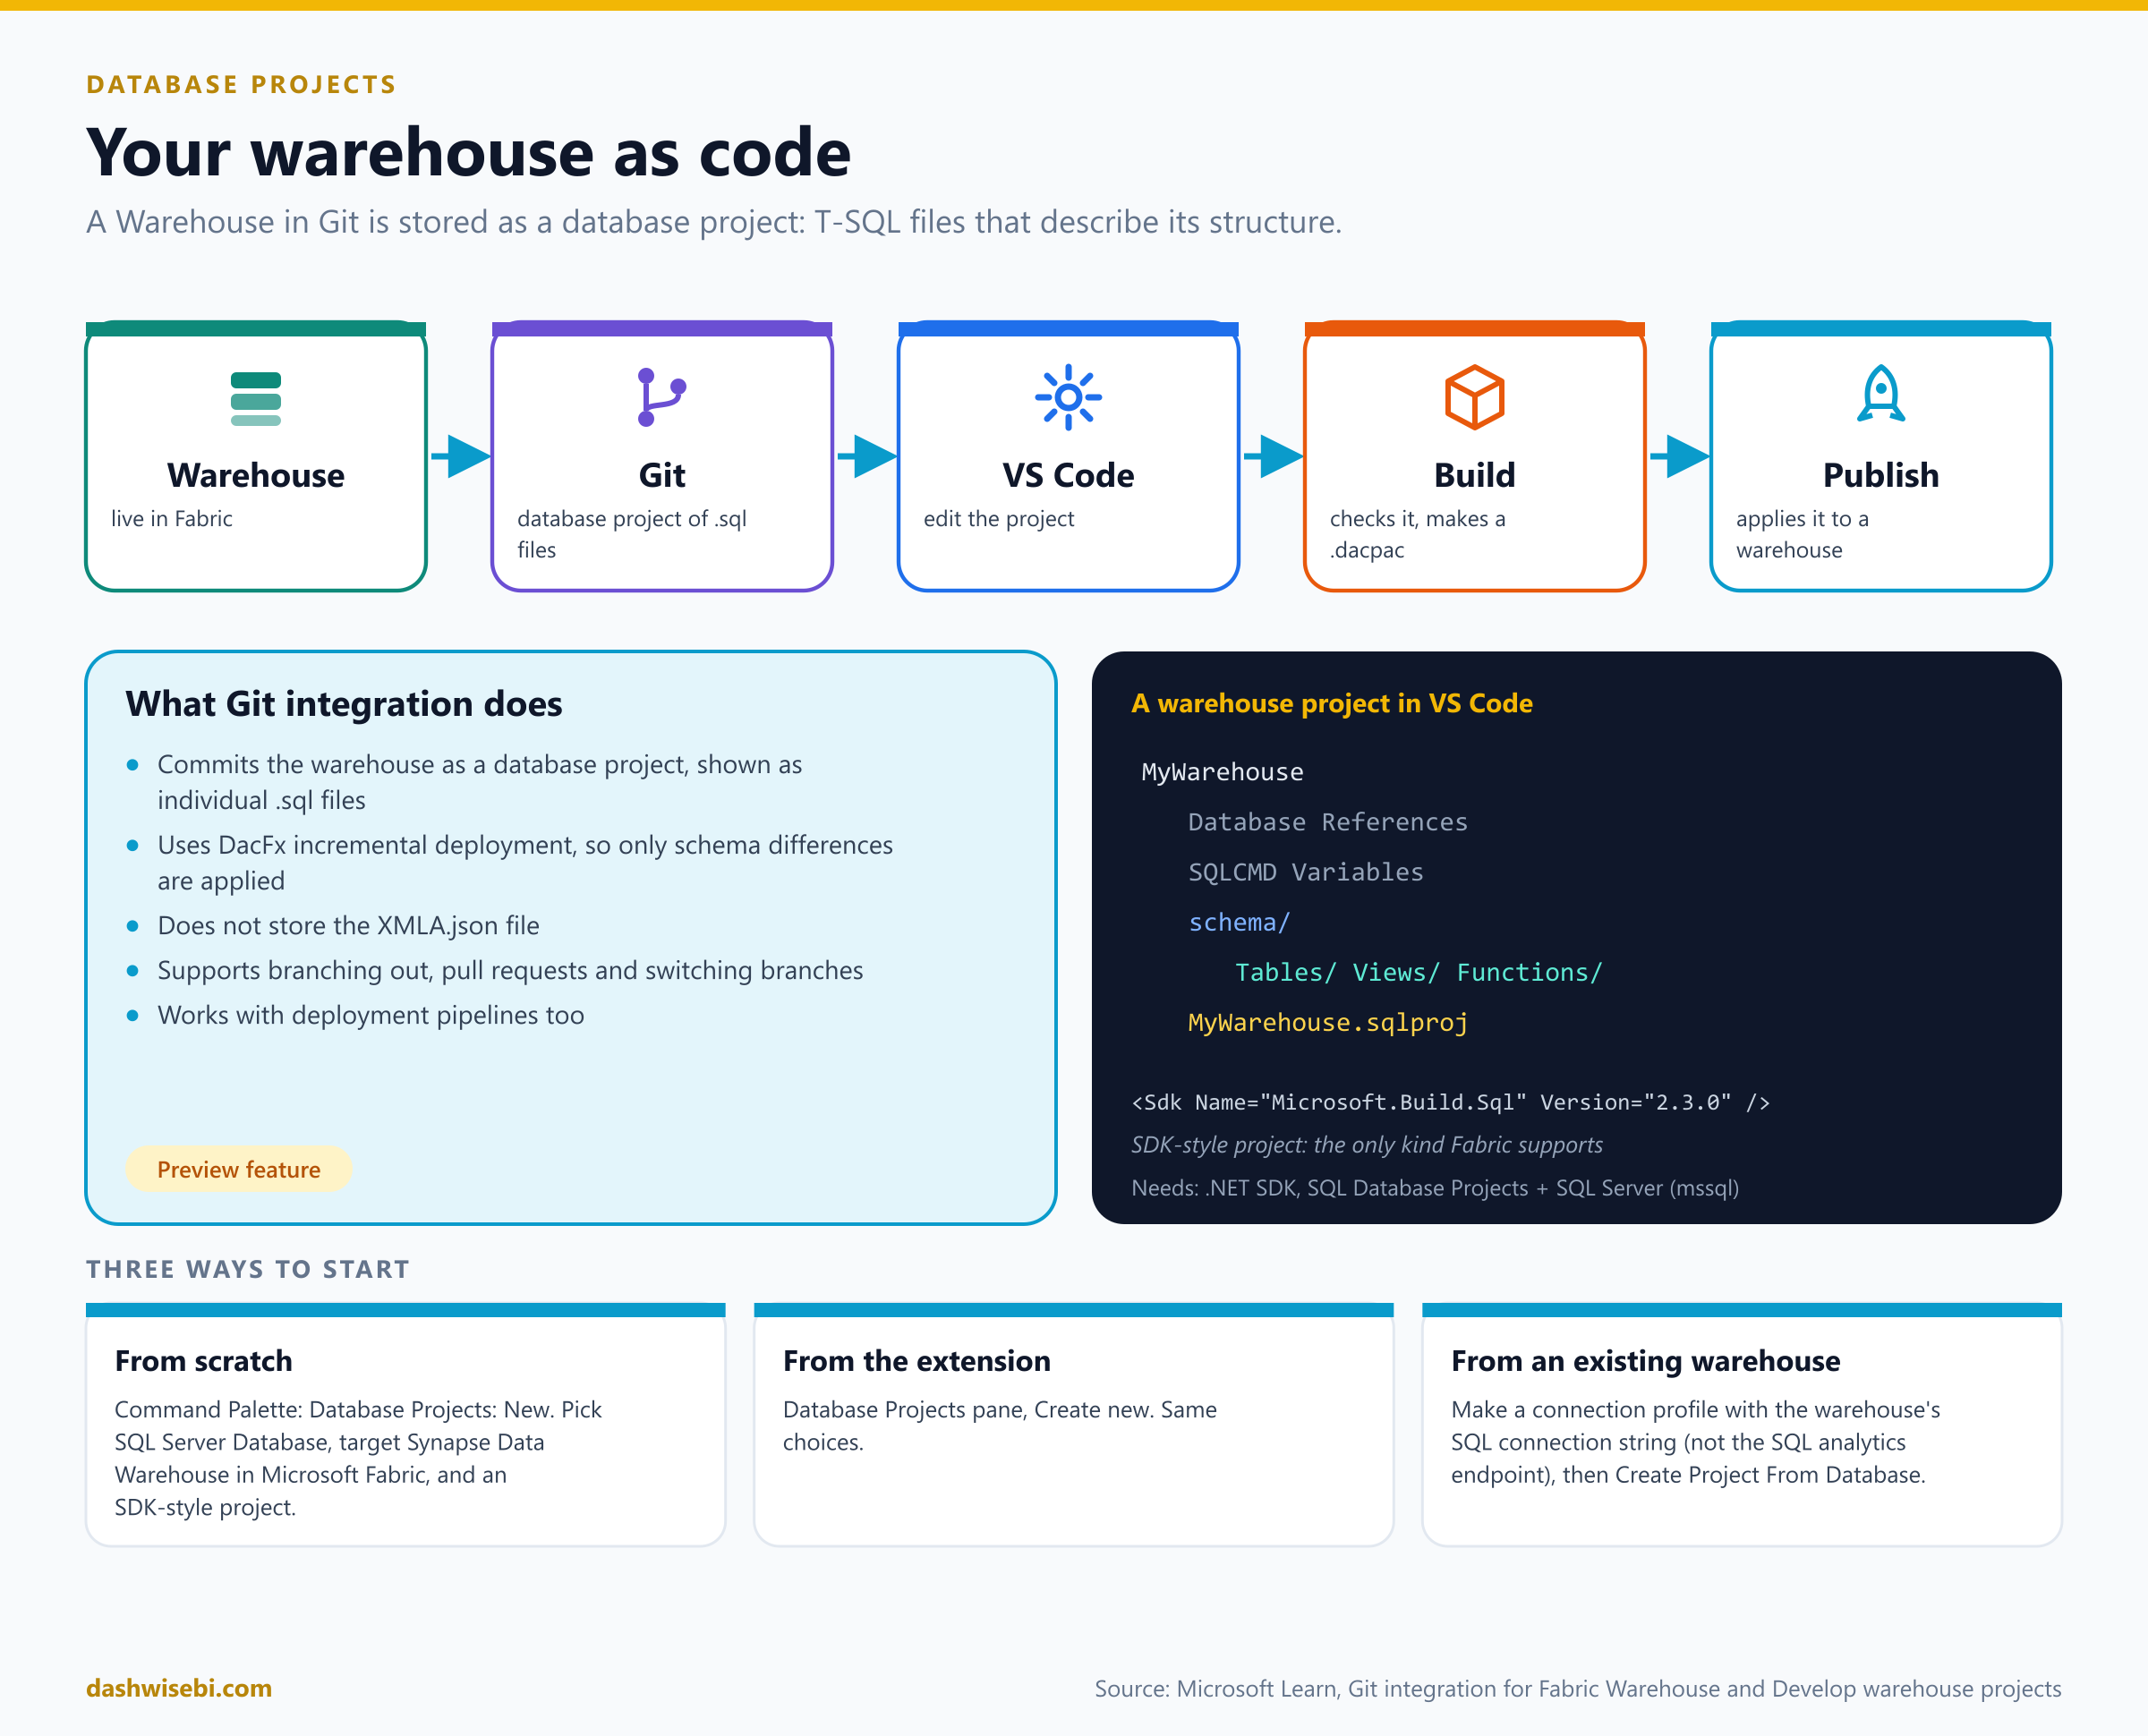
Warehouse Git integration is a preview feature. When you commit, Fabric uses DacFx-based incremental schema deployment, so only the schema differences are applied rather than the whole definition. It does not store the XMLA.json file, so the default semantic model metadata stays out of Git. You can branch out, use pull requests, switch branches, and deploy through deployment pipelines.
Developing a project in Visual Studio Code
To work with the project on your own machine you need Visual Studio Code, the .NET SDK and two extensions: SQL Database Projects and SQL Server (mssql). Contributor or higher access to the warehouse is required. You can start in three ways:
From scratch, with the Command Palette command Database Projects: New.
From the Database Projects extension, with Create new.
From an existing warehouse. Create a connection profile using the warehouse's SQL connection string from its settings (this is different from the SQL analytics endpoint), then choose Create Project From Database.
For a new project, choose SQL Server Database as the type and Synapse Data Warehouse in Microsoft Fabric as the target platform. Only SDK-style projects are supported for Fabric Data Warehouse. A project created from a warehouse has a schema folder with Tables, Views and Functions, plus the .sqlproj file. Edit that file to use a current Microsoft.Build.Sql SDK version and to reference the Microsoft.SqlServer.Dacpacs.FabricDw package.
The cycle is: edit the .sql files, build (which validates everything and produces a .dacpac file), then publish to a warehouse. Changes exist only in the project until you build and publish. For your first deployment to a target, choose Generate Script and review the T-SQL, because generating a script changes nothing. You can save your choices as a publish profile (.publish.xml) to reuse for different environments. Note that the VS Code default terminal must be PowerShell for the build to succeed.
Deployment settings that protect data
BlockOnPossibleDataLossstops a deployment that could lose data, such as dropping a column that holds data. Keep itTruein production.DropObjectsNotInSourcedrops objects in the target that aren't in the project. It is useful to tidy dev and test, and dangerous in production.A pre-deployment script runs before the schema changes (for example to archive data before dropping a table). A post-deployment script runs afterwards (for example to seed reference data). Both should be idempotent, meaning you can run them many times safely.
Limitations to remember
SQL security features such as permissions need a script-based approach. Microsoft suggests a post-deployment script in the database project.
Pre- and post-deployment scripts and extra publish settings added to the project through Git aren't preserved by the workflows in Fabric, so manage them outside the workspace.
You can't do selective commits inside a warehouse. Changes are committed at the warehouse item level.
Version control for SQL analytics endpoints isn't available yet, and cross-item dependencies between warehouses and endpoints aren't supported.
Warehouses that reference each other form a cyclic dependency, which makes branch out and sync fail.
Don't send a Dataflow Gen2 output to a warehouse: it creates a
DataflowsStagingWarehouseitem that blocks commits and updates.An old
Microsoft.Build.Sqlversion pinned in the.sqlprojcan make commits fail on newer syntax such asIDENTITYcolumns andCLUSTER BY.Deployment between warehouses with different collations isn't supported.
3. Create and configure deployment pipelines
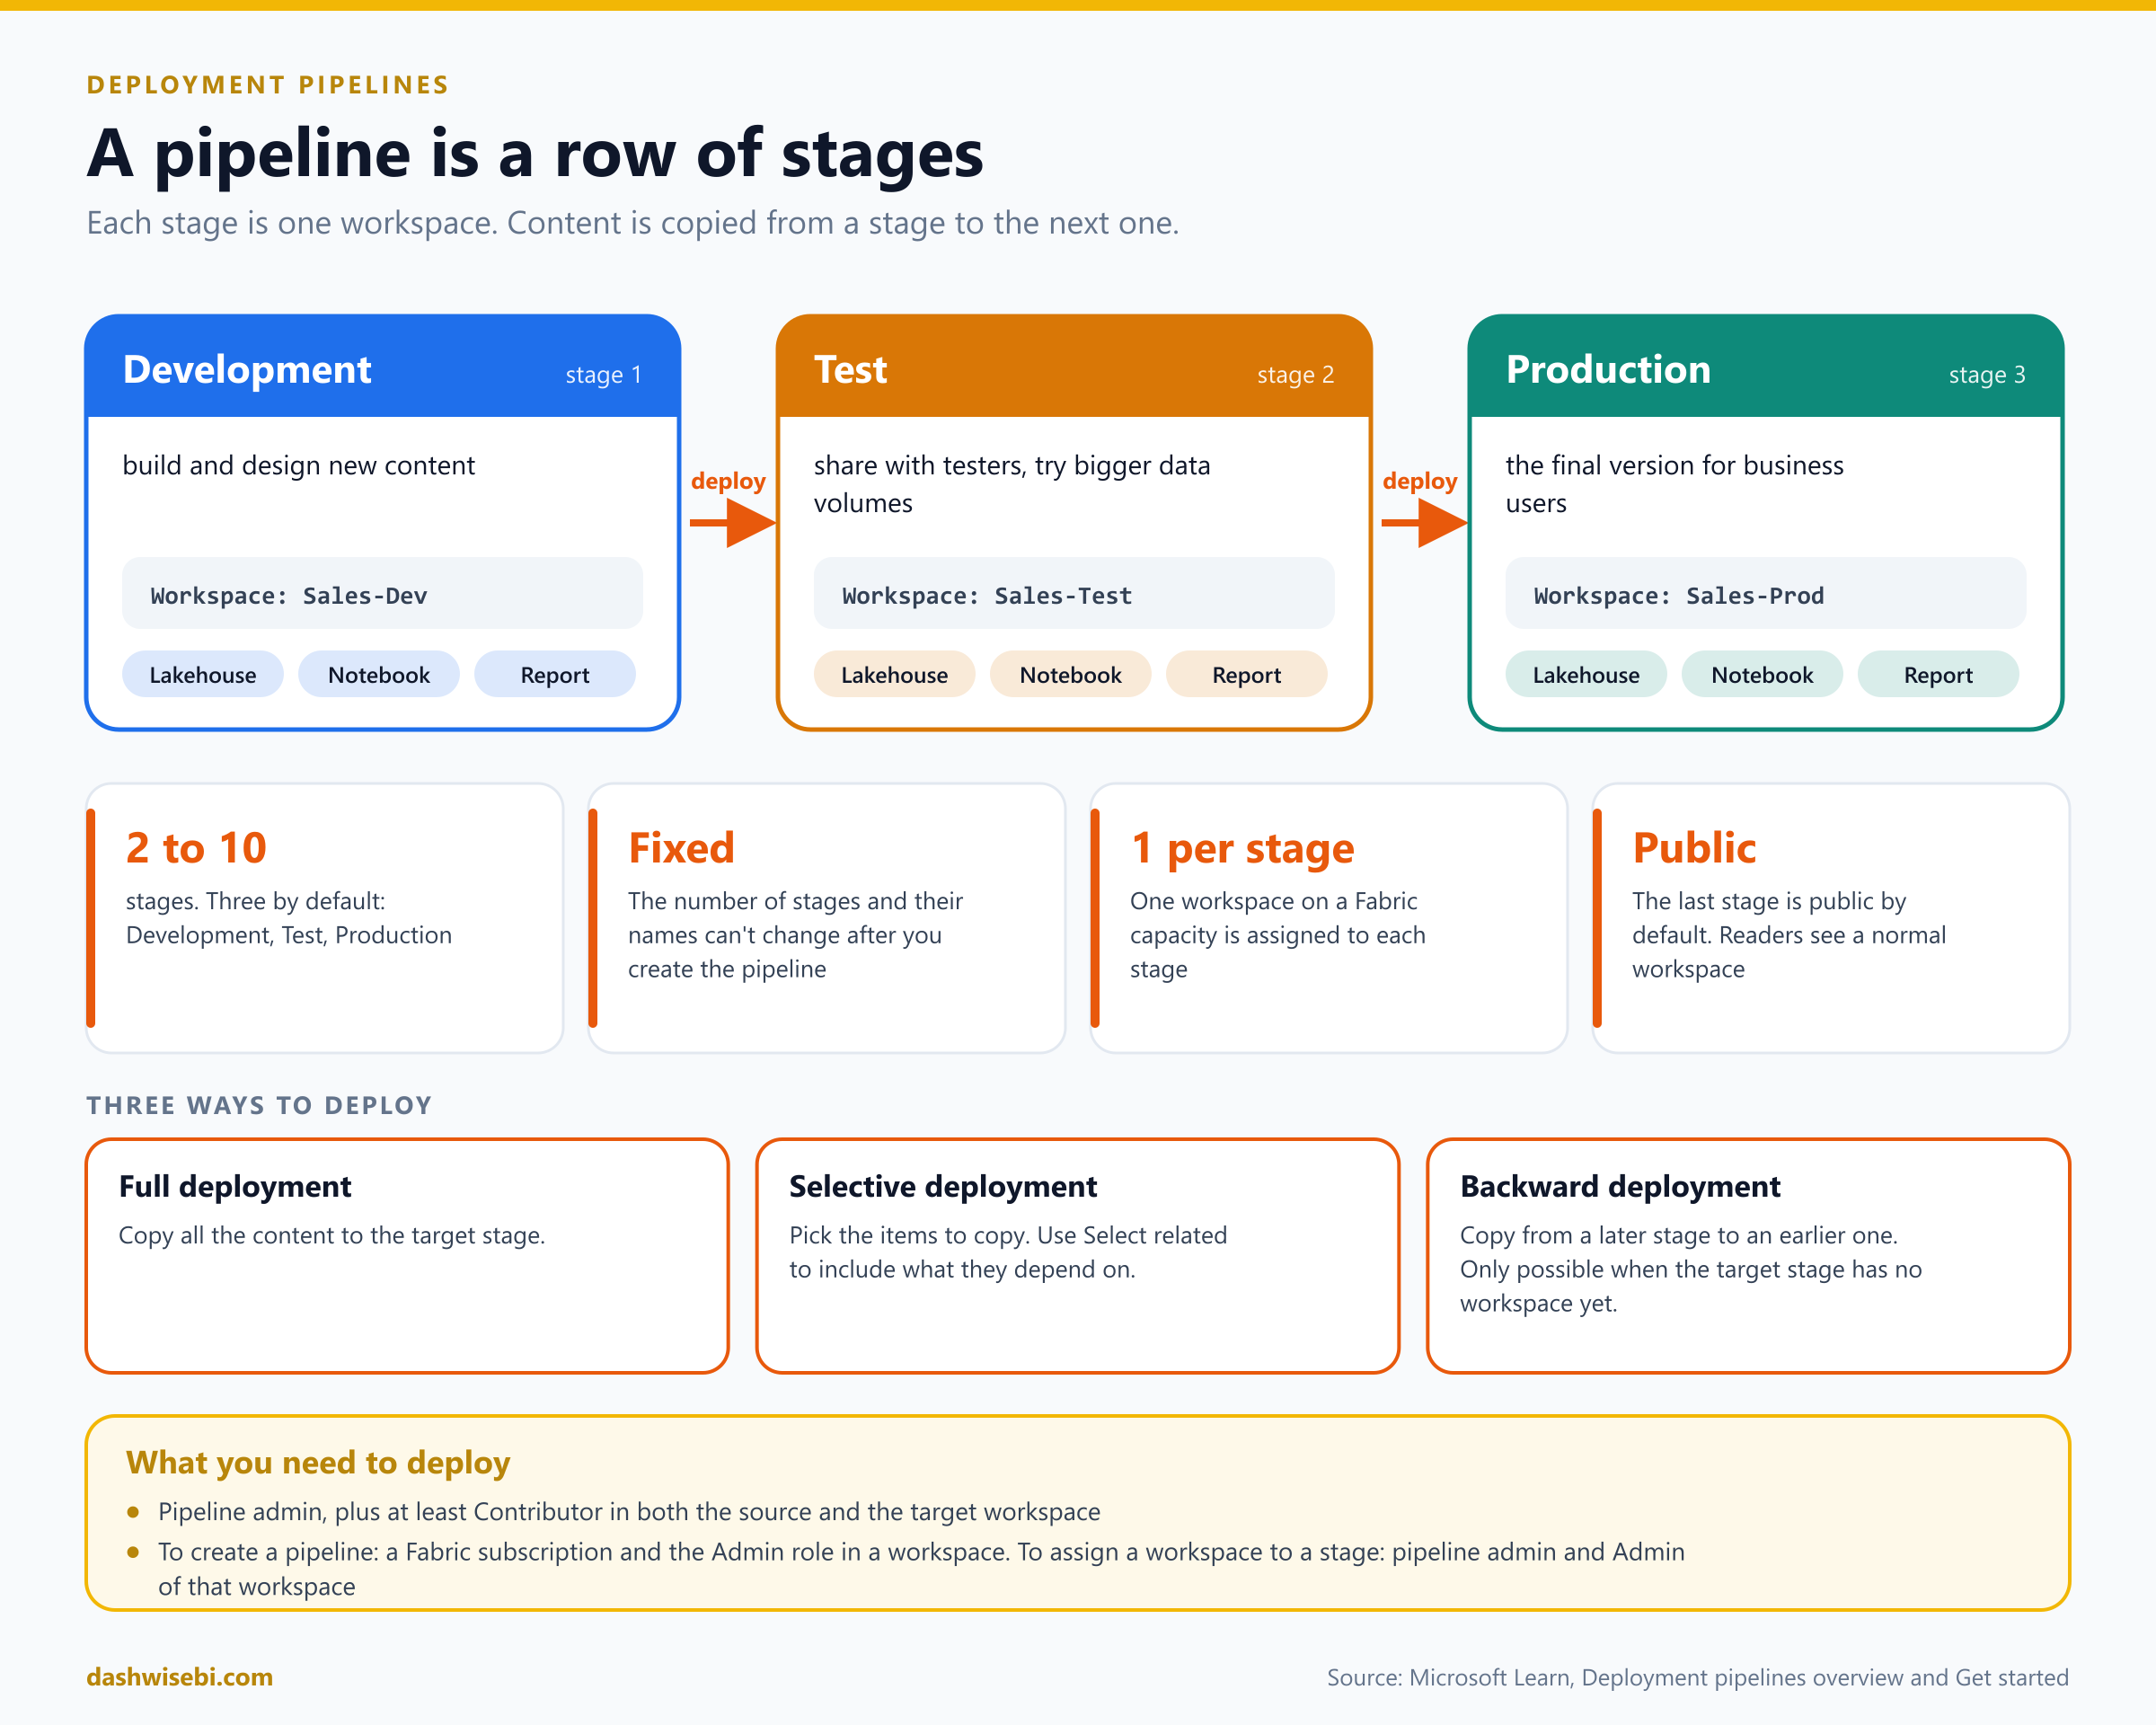
Git tracks and shares your changes. A deployment pipeline promotes them. It gives you a series of stages, each one a workspace, and copies content from one stage to the next so you can test before users see it.
The structure
A pipeline has 2 to 10 stages. The default is three: Development, Test and Production. You can add, delete and rename stages while you create it, but the number and names are fixed afterwards.
Each stage gets one workspace on a Fabric capacity. You assign an existing workspace to a stage, or deploy into an empty stage and Fabric creates the workspace.
By default the last stage is public, so people who aren't pipeline users see a normal workspace. You can change this at any time.
To create a pipeline you need a Fabric subscription and the Admin role in a workspace. To assign a workspace you must be pipeline admin and Admin of that workspace.
Three ways to deploy
Full deployment copies everything to the target stage.
Selective deployment copies only the items you pick. Select related adds the items they depend on.
Backward deployment copies from a later stage to an earlier one, but only when the target stage is empty.
To deploy, you must be a pipeline admin and at least a Contributor in both the source and the target workspace. Deployment history shows when each stage was last updated.
What a deployment copies
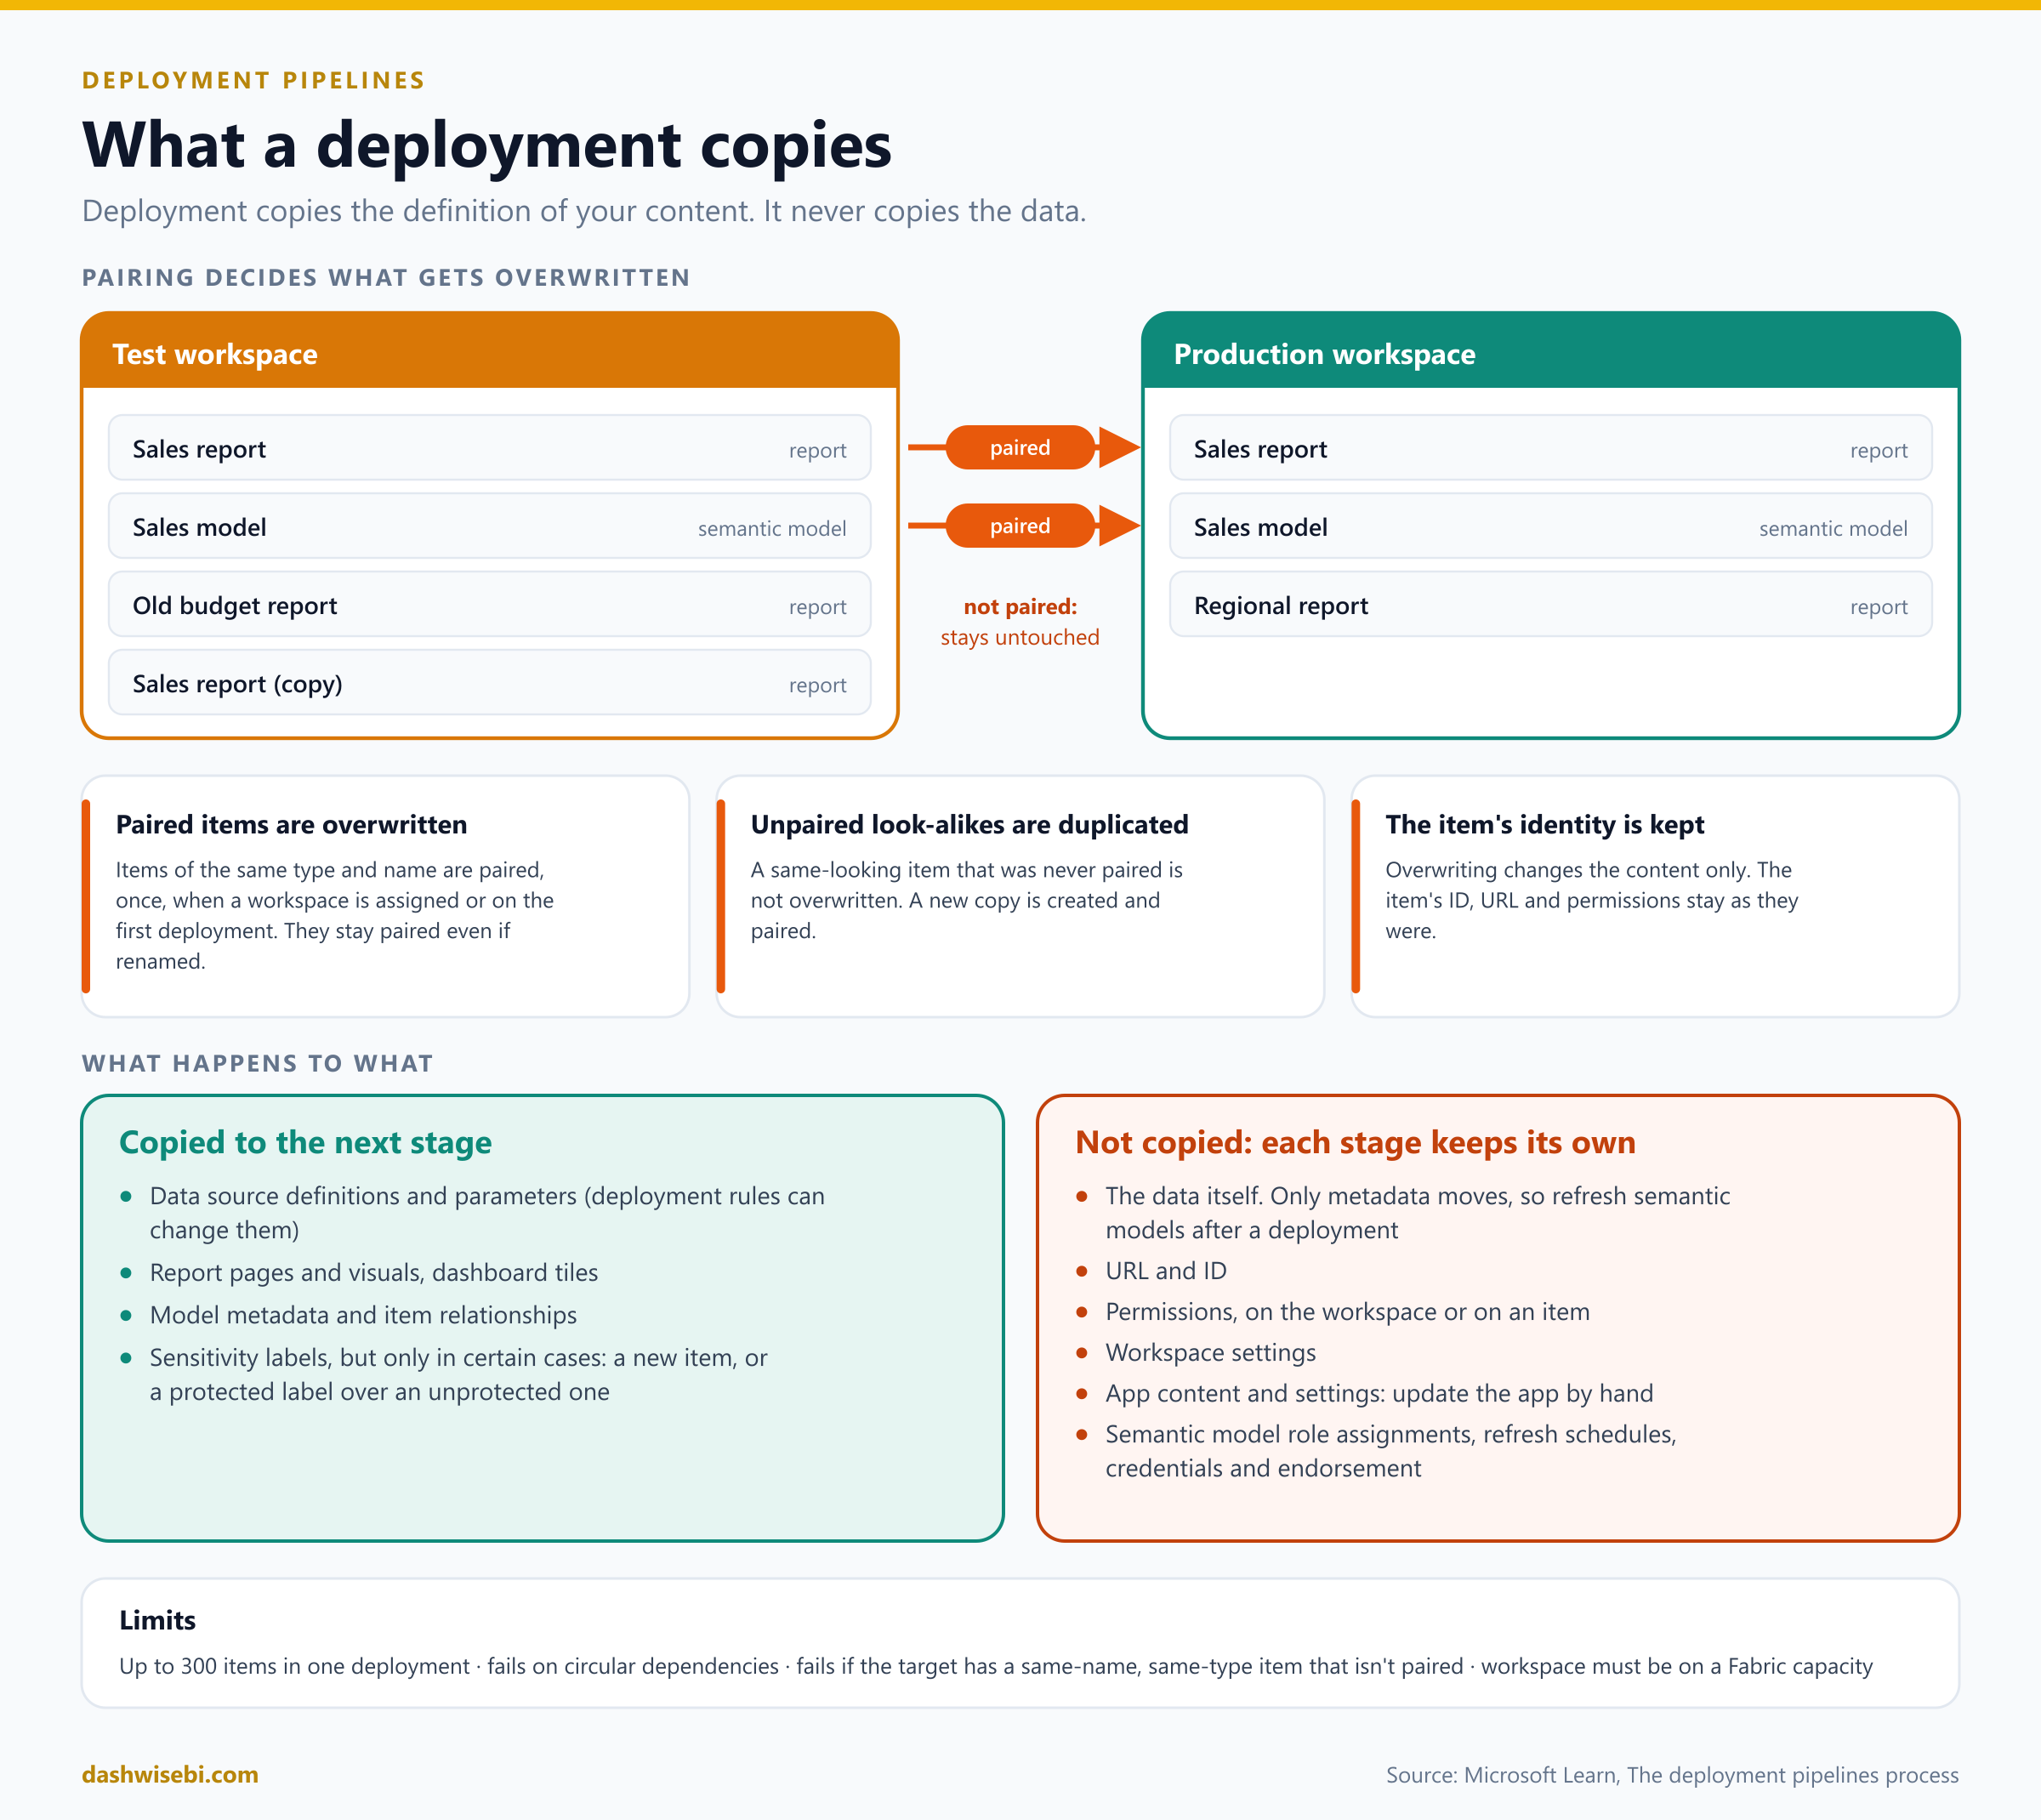
Fabric decides what to overwrite using pairing. An item in one stage is paired with the item of the same type and name in the next stage. The pairing is made once, when a workspace is assigned or at the first deployment, and the items stay paired even if you rename them. Paired items are overwritten, but only their content: the item's ID, URL and permissions don't change. Items that look identical but were never paired are not overwritten. A duplicate is created instead.
Copied: data sources and parameters, report pages and visuals, dashboard tiles, model metadata and item relationships. Sensitivity labels are copied only in some cases, such as a new item or a protected label replacing an unprotected one.
Not copied: the data itself (only metadata moves, so refresh semantic models after deploying), URLs and IDs, permissions, workspace settings and app content. Semantic model role assignments, refresh schedules, data source credentials and endorsement also stay as they were in the target.
A few limits: a single deployment can include up to 300 items, deployment fails if items depend on each other in a circle, and for a first-time deployment of a Power BI item it fails if the target stage already has an item with the same name and type that isn't paired.
Compare, then use rules
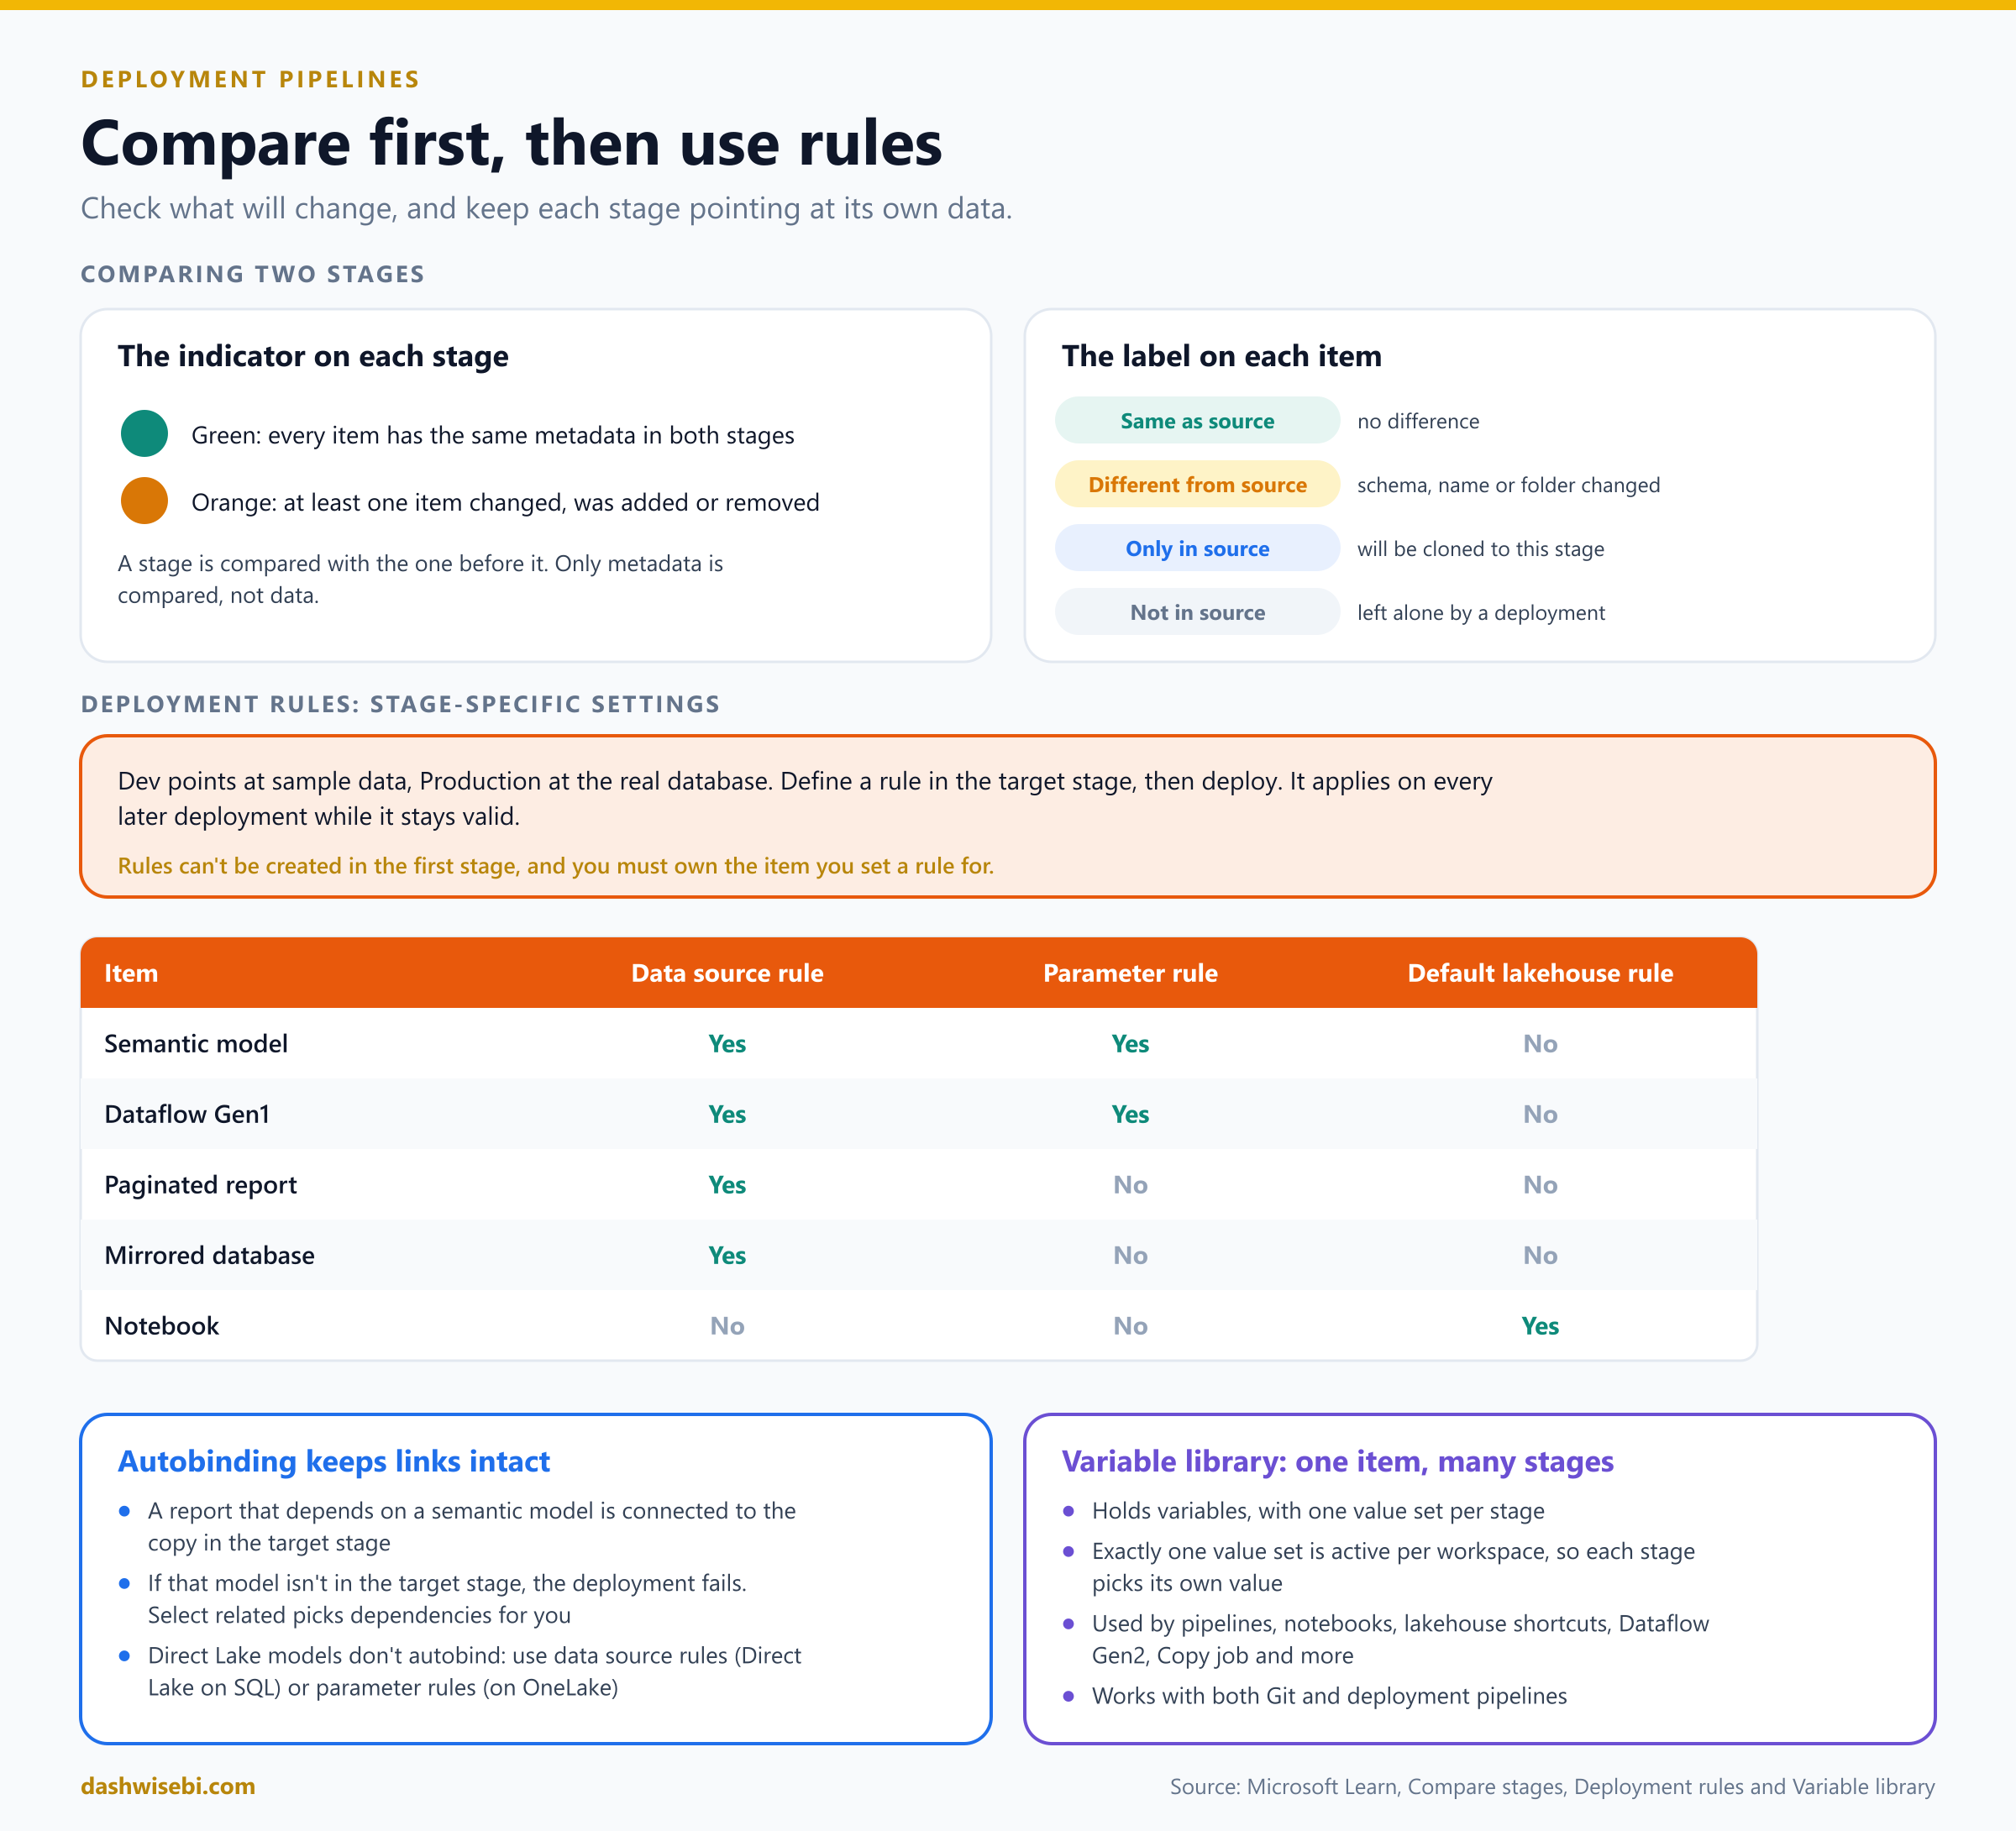
Before you deploy, look at the comparison. Each stage shows a green indicator when its items have the same metadata as the stage before it, and an orange one when at least one item was changed, added or removed. Items are labelled Same as source, Different from source, Only in source (it will be cloned) or Not in source (a deployment leaves it alone). Only metadata is compared, never data.
Different stages usually need different settings: development may read sample data while production reads the real database. Deployment rules solve this. You define a rule in the target stage, then deploy. After that the rule is applied on every deployment as long as it stays valid. The three kinds are:
Data source rules for semantic models, Dataflow Gen1, paginated reports and mirrored databases. They only work when changing to a data source of the same type.
Parameter rules for semantic models and Dataflow Gen1.
Default lakehouse rules for notebooks.
Rules can't be created in the first stage, and you must own the item you set a rule for. If the data source or parameter a rule points to is later changed or removed in the source stage, the rule is no longer valid and the deployment fails.
Autobinding keeps related items connected: a report that depends on a semantic model is connected to that model's copy in the target stage. If the model isn't in the target stage the deployment fails, which is why Select related exists. Direct Lake semantic models don't autobind. For Direct Lake on SQL use data source rules, and for Direct Lake on OneLake use parameters and parameter rules.
A variable library is another way to handle per-stage values. It is a workspace item holding variables, each with a value for every stage in a set of value sets. Exactly one value set is active in each workspace, so every stage automatically uses its own value. Pipelines, notebooks, lakehouse shortcuts, Dataflow Gen2, Copy job and other items can use it, and it works with both Git and deployment pipelines.
Choosing a release workflow
Git and deployment pipelines can be combined in different ways. Microsoft describes four options for the release process, and says many organisations use a hybrid.
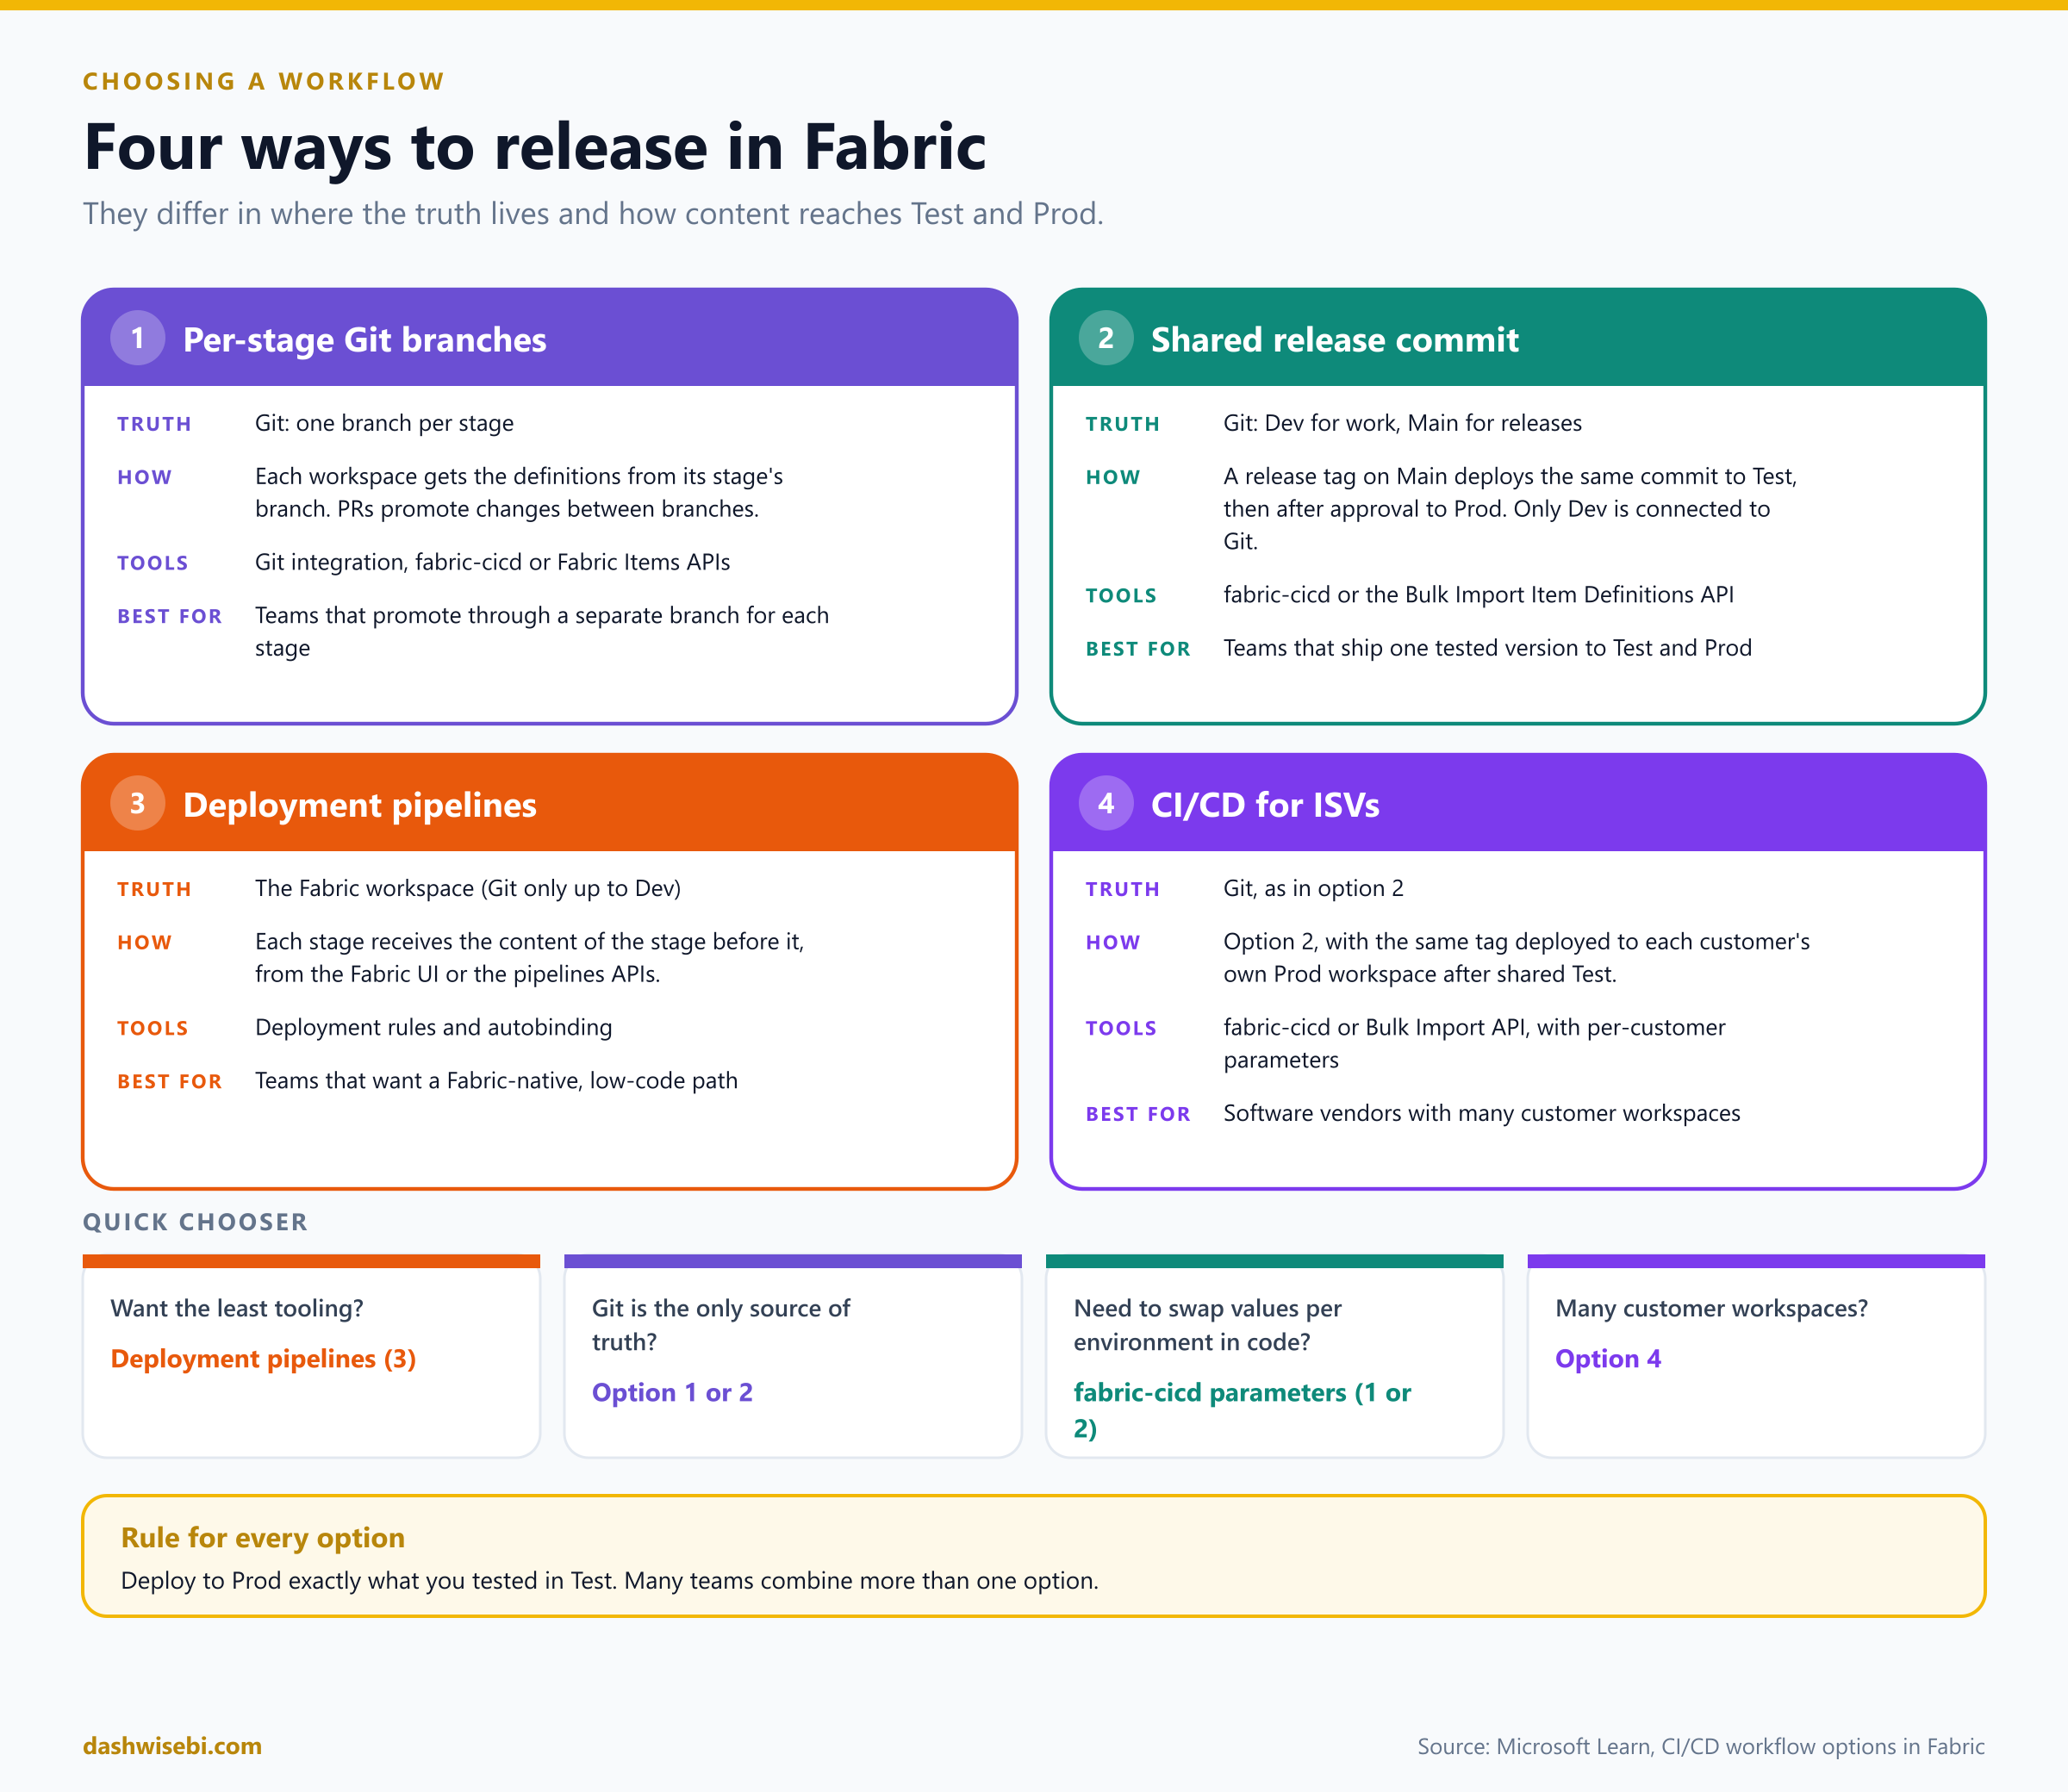
Per-stage Git branches. Git is the source of truth, with a branch for each stage. Pull requests promote changes from one branch to the next, and each workspace gets definitions from its own branch, using Git integration, the fabric-cicd library or the Fabric Items APIs.
Shared release commit. Developers work on a Dev branch, and Main holds only what you choose to release. A release tag on Main deploys the same commit to Test, then to Prod after validation and approval. Only the Dev workspace is connected to Git.
Deployment pipelines. Git is connected only up to Dev. From there each stage receives the content of the previous stage's workspace, from the Fabric portal or through the deployment pipelines APIs, with deployment rules and autobinding for stage settings.
CI/CD for ISVs. Option 2, with the same tag deployed to each customer's own Prod workspace after a shared Test stage.
Whichever you choose, deploy to Prod exactly what you tested in Test. Option 3 is the lowest-effort path and suits teams with little DevOps tooling. Options 1 and 2 suit teams that want Git as the single source of truth, and fabric-cicd parameterization lets them swap values per environment in code.
Common mix-ups
"Git and deployment pipelines do the same job." They don't. Git saves and versions changes, and a deployment pipeline promotes content between stages.
"A deployment copies my data." It copies only metadata. Refresh after deploying.
"I can pick items when I update from Git." You can't. Update always takes the whole branch. You can pick items when you commit or undo.
"Contributors can switch branches." Only if an Admin has turned on the workspace setting that allows it.
"I can add a stage to my pipeline later." The number and names of stages are fixed at creation.
"I can set a rule in the Development stage." Rules are created in later stages, never in the first.
"A workspace can follow several branches." A workspace connects to one branch and one folder at a time.
Try these scenarios
Six exam-style questions. Cover the answers and test yourself.
1. The missing branch option
A Contributor with write access to all items in a Git-connected workspace can't switch the workspace to another branch. What must change?
Answer: A workspace Admin must turn on Allow users with at least Contributor role to change Git branch for that workspace.
2. The disabled commit
The Commit button is greyed out and one report shows a Conflict status. How can you keep the Git version of that report and carry on?
Answer: Choose Update, then Resolve Conflicts, and for that report select Accept incoming changes. The workspace change is lost and the status becomes Synced.
3. Production reads test data
After a deployment, a semantic model in Production still queries the test database. What should you configure?
Answer: A data source rule (or a parameter rule) on the semantic model in the Production stage, then deploy again. You must own the model, and the new source must be the same type.
4. Warehouse permissions
You version a warehouse through Git, but its SQL permissions aren't in the project. How do you carry them across environments?
Answer: Use a script-based approach, such as a post-deployment script in the SQL database project, because SQL security features aren't captured by the standard export.
5. Empty reports after deployment
A report deployed to Test opens but shows no numbers. Why?
Answer: Deployment pipelines copy metadata and not data, so the semantic model in the target stage has to be refreshed.
6. The fourth stage
A team created a pipeline with three stages and now wants a pre-production stage as well. What do they do?
Answer: The number of stages can't be changed after creation, so they create a new pipeline with four stages and assign the workspaces to it.
Where to go next
Practise with the timed DP-700 practice exams on DashWiseBI, and join a live session on the Fabric Data Days schedule.
Read Episode 1: Fabric Overview and Workspace Settings if you haven't yet.
Do the Microsoft Learn module Implement continuous integration and continuous delivery (CI/CD) in Microsoft Fabric. It has 8 units, including an exercise on deployment pipelines, and covers version control, deployment pipelines and automation with Fabric APIs. It is part of the learning path Manage a Microsoft Fabric environment, which belongs to the course Implement data engineering solutions using Microsoft Fabric. Also see the official DP-700 study guide.
Read the sources behind this post: Overview of Fabric Git integration, Get started with Git integration, Git integration process, Resolve conflicts, Development process using branch workspace, Git integration for Fabric Warehouse, Develop warehouse projects in Visual Studio Code, Deployment pipelines overview, Get started with deployment pipelines, The deployment pipelines process, Deployment rules, Compare content in different stages, Variable library and CI/CD workflow options in Fabric.
Keep reading
DP-700 Episode 4: Orchestrate Processes
DP-700 study guide to orchestration in Fabric: Dataflow Gen2 vs pipeline vs notebook, schedules, event triggers, parameters, expressions and notebook patterns.
DP-700 Episode 3: Security & Governance
DP-700 study guide to Fabric security: workspace and item access, RLS, CLS, OLS, folder access, masking, sensitivity labels, endorsement, audit logs and OneLake security.